最近更新于 2024-05-11 13:22
前言
2024.4.24
月中的时候大概看了下 Spring Boot,感觉干不了啥,接着过了下 Node.js 基础,对 js 的基础语法了解了点,再准备过渡到前端,了解一下 Vue(Vue 的依赖框架创建都是基于 Node.js 来完成)。
Vue 的官方文档挺友好的,有多国语言,包含中文文档:https://cn.vuejs.org/guide/quick-start.html
.vue 文件其实是 html + css + js 的混合,三者可以写到同一个文件中。script 标签内写 js,template 标签内写 html,style 标签内写 css。
2024.4.30
前面 Node.js 搞了点基础,就转 Vue 玩了一下,然后又回去深挖 Node.js,已经实践了一下 ejs 模板引擎使用(服务器渲染前端)、数据库连接、RESTful API,以及 cookie 和 session id 的设置(简单模拟登录保持)。用接口测试工具研究太麻烦,要是用 ejs 渲染前端更显得麻烦,还是得回来学习专用的前端框架,组合后端接口一起玩。
我是实践了一下模板语法、条件渲染、列表渲染再回去挖 Node.js 的,在 Node.js 中实践 ejs 模板引擎部分就很容易联想到 Vue 的模板语法和渲染这套,非常相似,在 Vue 中只是用,通过 ejs 使用就大概能理解 Vue 这套模板语法和渲染的实现原理了,一下通透了。不过用 ejs 很多东西要亲自写,而 Vue 则已经包装好了,可以节省不少功夫。
环境
Node.js 20.12.2
Vue 3.4.21
开始
创建项目
npm create vue@latest模板语法
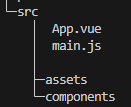
main.js
import { createApp } from 'vue'
import App from './App.vue' // 导入名称可以随意命名,比如写 import MyApp,后面就用 MyApp 就行

createApp(App).mount('#app')
文本插值
相当于取变量中的值,使用双大括号
App.vue
<template>
  <h1>模板语法</h1>
  <p>msg: {{ msg }}</p>
  <p>number: {{ number * 2 }}</p>
  <p>ok: {{ ok ? 'yes' : 'no' }}</p>
</template>

<script setup>
const msg = 'hello world'
const number = 10
const ok = true
</script>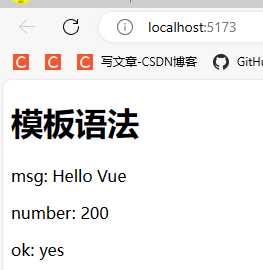
原始 HTML
相当于在变量中保存 html 代码,并且取出来按照 html 解析,使用 v-html 指令
App.vue
<template>
  <span v-html="homePage"></span>
  <p v-html="blog"></p>
</template>

<script setup>
const homePage = '<a href="https://iyatt.com">主页</a>'
const blog = '<a href="https://blog.iyatt.com">博客</a>'
</script>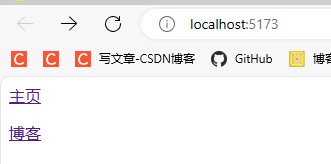
属性绑定
相当于属性可以通过变量指定,使用 v-bind 指令。
App.vue
<template>
  <div v-bind:id="dynamicID1"></div>
  <div :id="dynamicID2"></div> <!-- 简写 -->

  <!-- 3.4 版本开始支持
      如果属性名称与绑定的变量名称相同可以简写 -->
  <div :id></div>
  <div v-bind:id></div>
</template>

<script setup>
const dynamicID1 = 'testID1';
const dynamicID2 = 'testID2';
const id = 'testID3';
</script>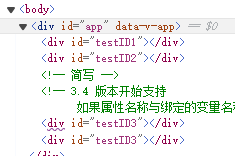
布尔型属性
属性值为空或未定义时会自动取消属性
App.vue
<template>
  <div :attribute1 :attribute2 :attribute3 :attribute4 :attribute5>1</div>
</template>

<script setup>
const attribute1 = 'test';
const attribute2 = null;
const attribute3 = undefined;
const attribute4 = true;
const attribute5 = 10;
</script>
一次绑定多个属性
<template>
  <div v-bind="attributes">测试</div>
</template>

<script setup>
const attributes = {
    class: 'testClass',
    id: 'testID'
}
</script>
条件渲染
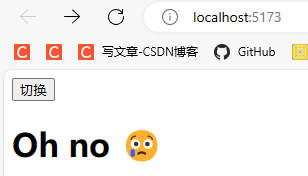
v-if v-else
App.vue
<template>
  <button @click="status = !status">切换</button>

  <h1 v-if="status">现在是打开状态</h1>
  <h1 v-else>Oh no 😢</h1>
</template>

<script setup>
import { ref } from 'vue';

const status = ref(true); // 使用 ref 可以动态响应
</script>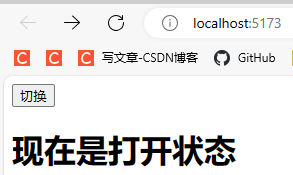
v-else-if
App.vue
<template>
  <div v-if="value === 'A'">AAA</div>
  <div v-else-if="value === 'B'">BBB</div>
  <div v-else-if="value === 'C'">CCC</div>
  <div v-else>DDD</div>
</template>

<script setup>
const value = "C";
</script>
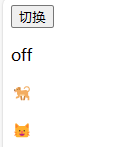
template 多元素条件
将多个元素放进一个包装器元素里,一起接收条件控制
App.vue
<template>
  <button @click="status = !status">切换</button>

  <template v-if="status">
      <p> on </p>
      <p> 你好 </p>
  </template>
  <template v-else>
      <p> off </p>
      <p> 🐕 </p>
      <p> 🐱 </p>
  </template>
</template>

<script setup>
import { ref } from 'vue';

const status = ref(true);
</script>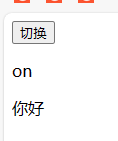
v-show
v-show 仅切换 display 属性
App.vue
<template>
  <button @click="status = !status">切换</button>
  <h1 v-show="status">Hello</h1>
</template>

<script setup>
import { ref } from 'vue';

const status = ref(true)
</script>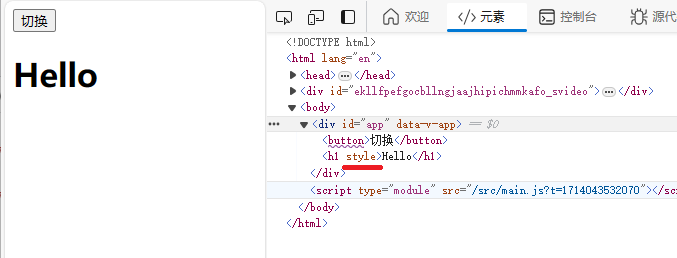
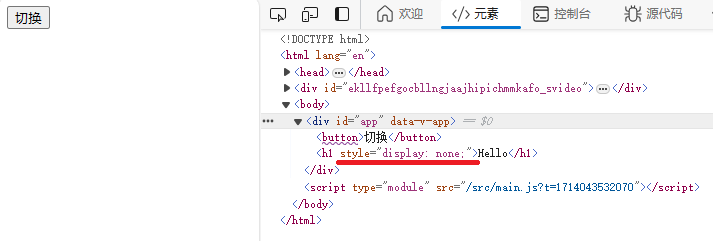
v-if 和 v-show 比较:https://cn.vuejs.org/guide/essentials/conditional.html#v-if-vs-v-show
列表渲染 v-for
数组
App.vue
<template>
  <li v-for="item in items">
      {{ item.msg }}
  </li>

  <hr>

  <!-- 解构 -->
  <li v-for="{ msg } in items">
      {{ msg }}
  </li>

  <hr>

  <!-- 添加索引 -->
  <li v-for="({ msg }, index) in items">
      {{ msg }} {{ index }}
  </li>

</template>

<!-- 组合式 API -->
<script setup>
import { ref } from 'vue';

const items = ref([
          { msg: "第一条消息"},
          { msg: "第二条消息"},
          { msg: "第三条消息"}
      ]);
</script>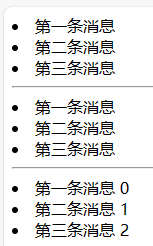
遍历时用的 in 可以换为 of,一样的效果
对象
<template>
  <ul>
      <li v-for="value in object">
          {{ value }}
      </li>

      <hr>

      <li v-for="(value, key) in object">
          {{ key }}: {{ value }}
      </li>

      <hr>

      <li v-for="(value, key, index) in object">
          {{ index }} {{ key }}: {{ value }}
      </li>
  </ul>
</template>

<script setup>
const object = {
          title: "How  to do lists in vue",
          author: "Jane Doe",
          publishedAt: "2016-04-10"
      };
</script>
响应式数据
直接定义的数据在页面中被使用,如果中间修改了数据值,页面上使用数据部分不会更新为最新的值。响应式数据则支持使用的页面自动更新为最新的值,定义响应式数据使用 Vue 中的 ref 和 reactive,后者不支持基本数据类型,前者本身只支持基本类型,但又能间接在内部使用 reactive 来支持对象类型。一般建议是直接使用 ref,除非表单多层级深的才直接用 reactive。
ref 对象
App.vue
<script setup lang="ts">
import { ref } from 'vue';

const value1 = ref('hello')
const value2 = 'hello'

console.log(value1)
console.log(value2)
</script>
可以看到控制台打印的信息,value1 是一个 RefImpl 的对象,其中 value 属性保存着值
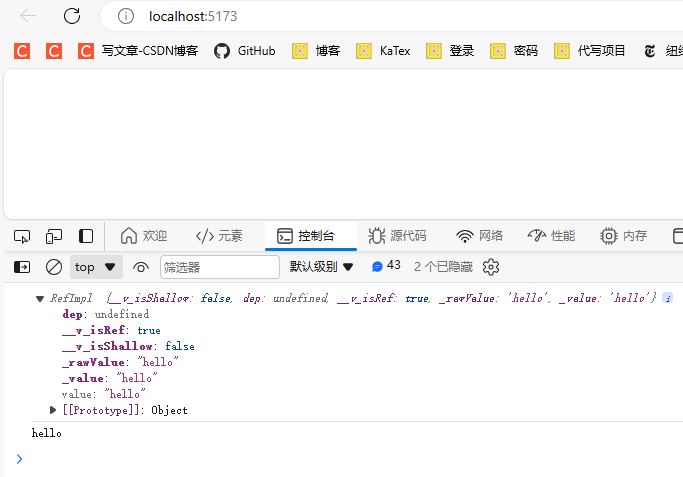
ref 使用
ref 对象的 value 属性中存储着变量值,在模板语法中是可以直接使用变量名,Vue 会自动取 .value,但是在 js 部分使用还是需要使用 .value 来操作。
<script setup lang="ts">
import { ref } from 'vue';

let num1 = ref(0)
let num2 = 0

// 在方法中,需要手动使用 .value
function fun1() {
    num1.value++
    console.log('num1: ', num1.value)
}

function fun2() {
    num2++
    console.log('num2: ', num2)
}
</script>

<template>
    <div>
        <!-- 模板语法中可以自动取 .value -->
        {{ num1 }}
        <button @click="fun1">num1++</button>
    </div>

    <div>
        {{ num2 }}
        <button @click="fun2">num2++</button>
    </div>
</template>
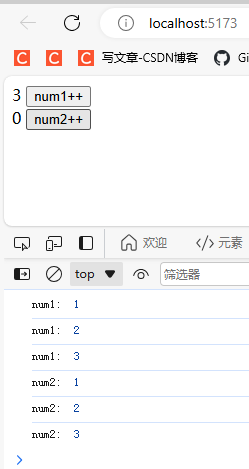
两个按扭各自点击了三次,num1 是响应式数据,页面引用值也更新了。num2 则是普通变量,页面上没有更新,但是从控制台打印的值可以看到实际是修改了的。
reactive 对象
App.vue
<script setup lang="ts">
import { reactive } from 'vue';

let value1 = reactive({
    name: '小强',
    age: 18
});

let value2 = reactive([
    { name: '小明', age: 18 },
    { name: '小红', age: 19 },
    { name: '小强', age: 20 }
])

console.log(value1);
console.log(value2);
</script>
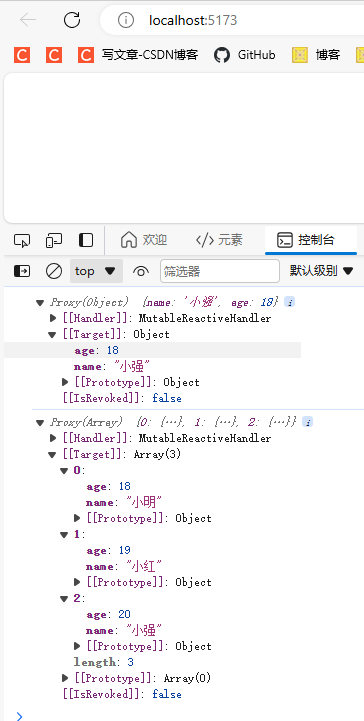
从控制台打印的信息可以看到返回的是一个 Proxy 对象(JS 内置),其中的 Target 存储着数据。
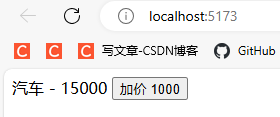
reactive 使用
App.vue
<script setup lang="ts">
import { reactive } from 'vue';

let value1 = reactive({
    commodity: '汽车',
    price: 10000
});

function add() {
    value1.price += 1000;
}
</script>

<template>
<div>
    {{ value1.commodity }} - {{ value1.price }}
    <button @click="add">加价</button>
</div>
</template>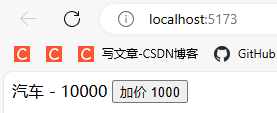
ref 定义非基本数据类型
使用 ref 定义的响应式数据在 js 中都需要通过 .value 来操作,而在模板语法中是可以直接使用的
App.vue
<script setup lang="ts">
import { ref } from 'vue';

let value1 = ref({
    commodity: '汽车',
    price: 10000
});

console.log(value1);

function add() {
    value1.value.price += 1000;
}
</script>

<template>
<div>
    {{ value1.commodity }} - {{ value1.price }}
    <button @click="add">加价 1000</button>
</div>
</template>
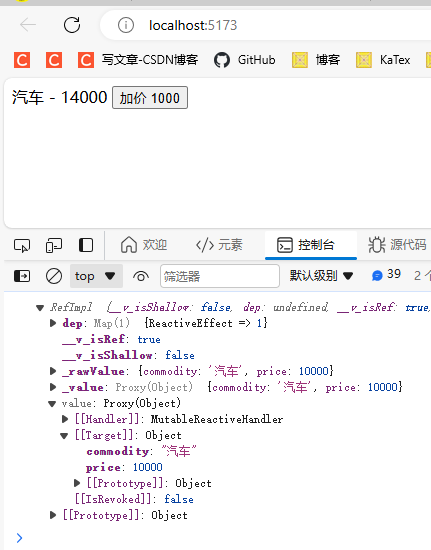
从打印的控制台输出可以看到,ref 定义的对象值也是存储在 value 属性中,而且 value 属性值是一个 Proxy 对象,也就是说实际实现也是使用了 reactive 来完成
解构
App.vue
<script setup lang="ts">
import { reactive, toRef, toRefs } from 'vue';

let value1 = reactive({
    commodity: '汽车',
    price: 10000
});

let { commodity, price }= toRefs(value1); // 解构多个属性
let price1 = toRef(value1, 'price'); // 解构单个属性

function add() {
    price1.value += 1000;
}
</script>

<template>
<div>
    {{ value1.price }} {{ price }} {{ price1 }}
    <button @click="add">加价 1000</button>
</div>
</template>
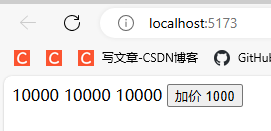
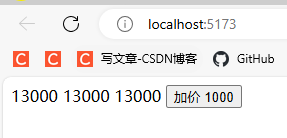
如果直接解构,得到的新变量其实是一份拷贝的数据,相当于是深拷贝的。对解构的变量修改,不会修改原对象。而使用 toRefs 或 toRef 进行解构,相当于浅拷贝,拿到的是原对象的属性地址,对解构变量修改,原对象的属性同步修改。
计算属性
App.vue
<script setup lang="ts">
import { computed, ref } from 'vue';

let value1 = ref(1)

let result1 = computed(() => {
    return value1.value ** 2
})

function addValue1() {
    ++value1.value
}
</script>

<template>
    <input v-model="value1" type="number" />
    <button @click="addValue1">++value1</button>
    {{ result1 }}
</template>
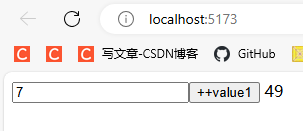
计算属性像是一个函数,可以执行一些指定操作,但是与函数不同。计算属性依赖的变量发生变化的时候,会自动调用执行,而且有缓存,即使多次访问计算属性,只要依赖的变量没有修改就不会重新执行,直接沿用前面的计算结果。
watch 监视
watch 是监视地址的变化,变量引用地址变化的才可以监视到。
对应文档中侦听器部分:https://cn.vuejs.org/guide/essentials/watchers.html
ref 定义的基本类型
App.vue
<script setup lang="ts">
import { ref, watch } from 'vue';

let value = ref(0)

function add() {
    ++value.value
}

// 监视 value
// 可以获取到新值和旧值
const stopWatch = watch(value, (newValue, oldValue) => {
    if (newValue > 5) {
        stopWatch() // watch 的返回值是一个函数,调用它可以停止监视
    }
    console.log(`newValue: ${newValue}, oldValue: ${oldValue}`)
})
</script>

<template>
    {{ value }}
    <button @click="add">add</button>
</template>
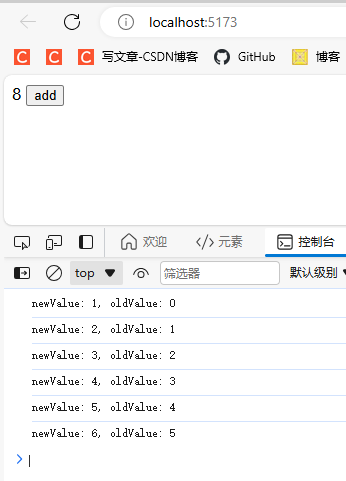
在值大于 5 后停止监视了,控制台也不再打印了
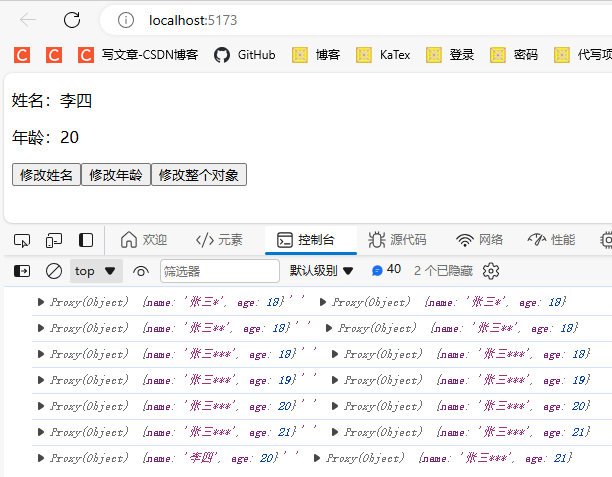
ref 定义的对象
<script setup lang="ts">
import { ref, watch } from 'vue';

let person = ref({
    name: '张三',
    age: 18
})

function changeName() {
    person.value.name += '*'
}

function changeAge() {
    ++person.value.age
}

function changePerson() {
    person.value = {
        name: '李四',
        age: 20
    }
}

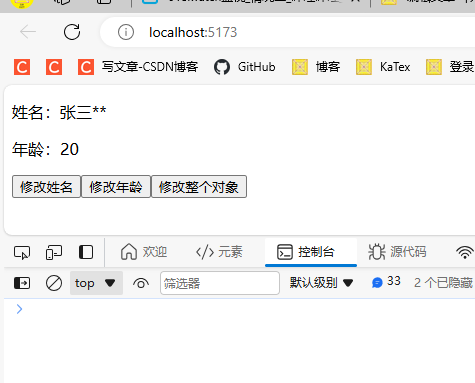
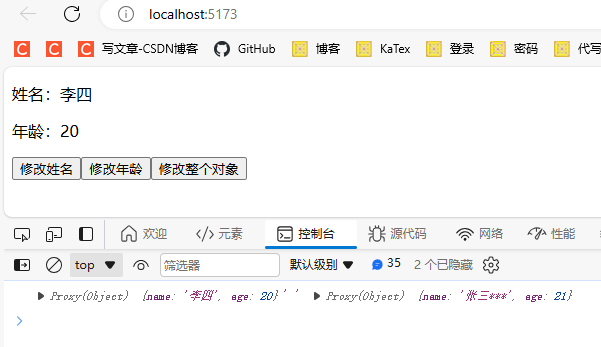
// // 情况一
// // 只监听 person 对象地址是否修改
watch(person, (newVal, oldVal) => {
    console.log(newVal, ' ', oldVal)
})

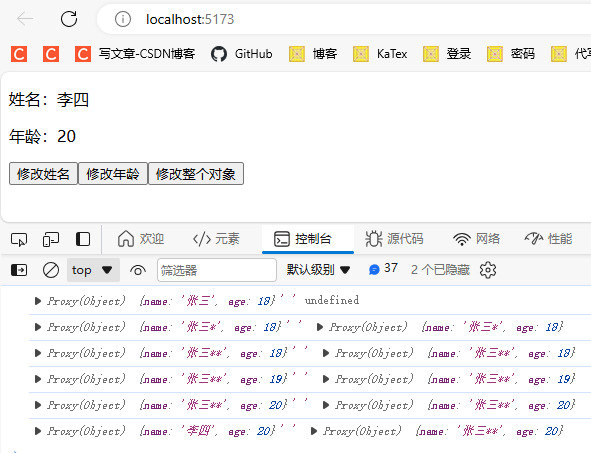
// // 情况二
// // 深度监听
// // 可以监听到 person 对象内部属性的变化
// // 但是在内部属性变化的时候会出现新旧值相同的情况
// // 这是因为新旧值变化实际只是修改了值,并没有修改地址
// // 监视发现变化后是去新旧值的地址去取值,新旧值是同一个地址,实际就是都是新值
// watch(person, (newVal, oldVal) => {
//     console.log(newVal, ' ', oldVal)
// }, {
//     deep: true
// })

// // 情况三
// // 深度监听 + 立即执行
// // 同情况二
// // 只是立即执行,在首次赋值时就会执行一次
// watch(person, (newVal, oldVal) => {
//     console.log(newVal, ' ', oldVal)
// }, {
//     deep: true,
//     immediate: true
// })
</script>

<template>
    <div>
        <p>姓名:{{ person.name }}</p>
        <p>年龄:{{ person.age }}</p>
        <button @click="changeName">修改姓名</button>
        <button @click="changeAge">修改年龄</button>
        <button @click="changePerson">修改整个对象</button>
    </div>
</template>
情况一
情况二
情况三
reactive 定义的对象
App.vue
<script setup lang="ts">
import { reactive, watch } from 'vue';

let person = reactive({
    name: '张三',
    age: 18
})

function changeName() {
    person.name += '*'
}

function changeAge() {
    ++person.age
}

function changePerson() {
    person = Object.assign(person, {
        name: '李四',
        age: 20
    })
}

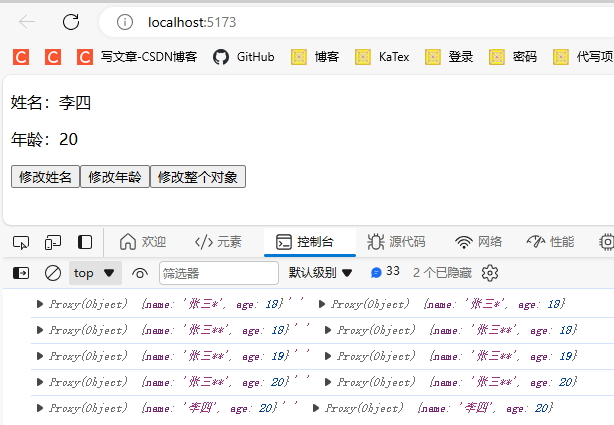
// // 情况一
// // 默认深度监视,person 内属性变化都能监测到,且无法关闭深度监视
// // 同样存在新旧值相同的情况,因为变化只是值变化,新旧值实际是同一块地址
// watch(person, (newVal, oldVal) => {
//     console.log(newVal, ' ', oldVal)
// })

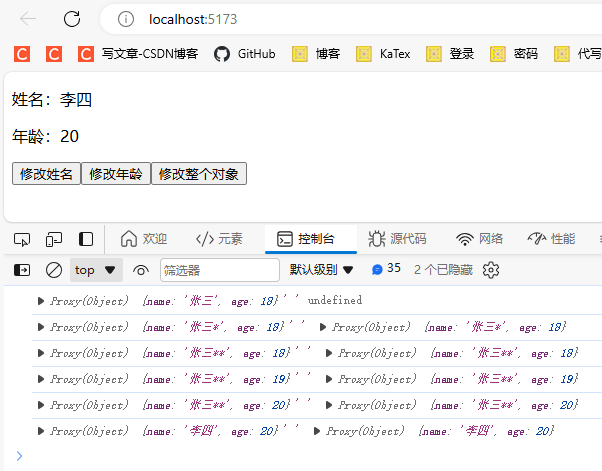
// 情况二
// 深度监听 + 立即执行
// 同情况一
// 只是立即执行,在首次赋值时就会执行一次
watch(person, (newVal, oldVal) => {
    console.log(newVal, ' ', oldVal)
}, {
    immediate: true
})
</script>

<template>
    <div>
        <p>姓名:{{ person.name }}</p>
        <p>年龄:{{ person.age }}</p>
        <button @click="changeName">修改姓名</button>
        <button @click="changeAge">修改年龄</button>
        <button @click="changePerson">修改整个对象</button>
    </div>
</template>
情况一
情况二
对象的属性
监视的一个对象的属性,如果这个属性是基本类型,就必须用函数形式,如果属性是一个对象,那么可以直接监视也能用函数形式,建议是用函数形式,用函数和不哟个函数形式,在监听属性的属性和属性对象整体上的现象有区别。
App.vue
<script setup lang="ts">
import { reactive, watch } from 'vue';

let person = reactive({
    name: '张三',
    cars: {
        car1: '奔驰',
        car2: '宝马'
    }
})

function changeName() {
    person.name = '李四'
}

function changeCar1() {
    person.cars.car1 = '奥迪'
}

function changeCars() {
    person.cars =  {
        car1: '特斯拉',
        car2: '保时捷'
    }
}

watch(() => person.name, (newVal, oldVal) => {
    console.log(newVal, ' ' , oldVal)
})

watch(() => person.cars, (newVal, oldVal) => {
    console.log(newVal, ' ' , oldVal)
}, {
    deep: true // 加上这个才能监视到属性对象内的变化。只有直接监视 reactive 对象本身的时候才能默认深度监视。
})
</script>

<template>
    <button @click="changeName">修改name</button>
    <button @click="changeCar1">修改car1</button>
    <button @click="changeCars">修改cars</button>
</template>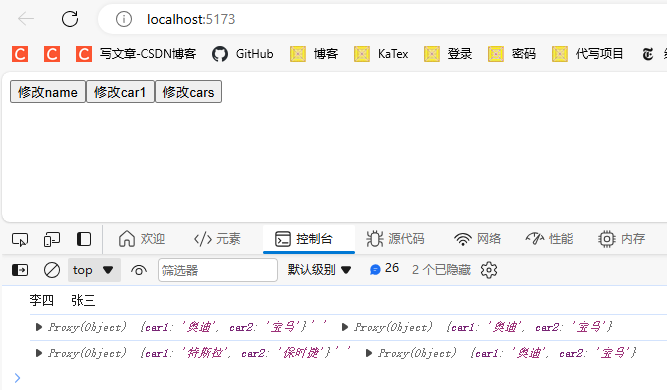
监视多个数据
App.vue
<script setup lang="ts">
import { reactive, watch } from 'vue';

let person = reactive({
    name: '张三',
    cars: {
        car1: '奔驰',
        car2: '宝马'
    }
})

function changeName() {
    person.name = '李四'
}

function changeCar1() {
    person.cars.car1 = '奥迪'
}

function changeCars() {
    person.cars =  {
        car1: '特斯拉',
        car2: '保时捷'
    }
}

// 通过数组可以一次性监视多个
watch([
    () => person.name,
    () => person.cars.car1,
    () => person.cars
], (newVal, oldVal) => {
    console.log(newVal, ' ' , oldVal)
})
</script>

<template>
    <button @click="changeName">修改name</button>
    <button @click="changeCar1">修改car1</button>
    <button @click="changeCars">修改cars</button>
</template>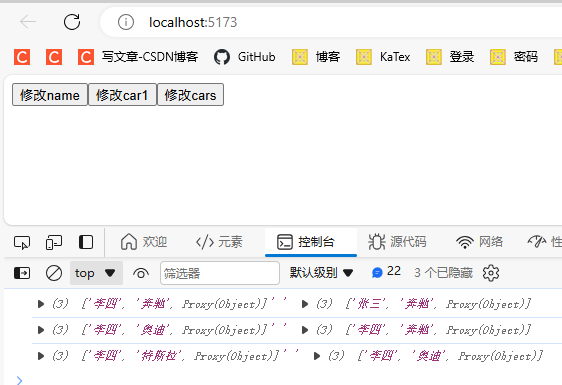
watchEffect 监视
前面的 watch 监视需要指定监视变量,使用 watchEffect 则自动监视变量,只有在回调函数中被使用的变量才会被监视
App.vue
<script setup lang="ts">
import { ref, watchEffect } from 'vue';

let value1  = ref(0);
let value2 = ref({
    a: 0
})

function increment1() {
    value1.value++;
}

function increment2() {
    value2.value.a++;
}

watchEffect(() => {
    if (value1.value === 1 || value2.value.a === 1)
    {
        value1.value = 10000;
        value2.value.a = 10000;
    }
})
</script>

<template>
    {{ value1 }}
    {{ value2.a }}
    <button @click="increment1">+1</button>
    <button @click="increment2">+a</button>
</template>
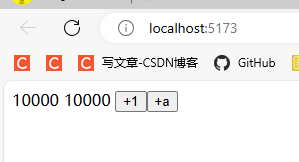
两个变量任意一个自增到 1 就会都改为 10000
TypeScript
2024.5.5
这段时间接触 Node.js 和 Vue3 的过程中,稍微了解了下 TypeScrit。最直观的映像就是在 JavaScript 基础上加了类型,实际执行的时候会把 ts 先编译为 js。区别就在类型上,对于 js 这种动态类型的语言来说,开发时 IDE 的语法提示就比较烂。在用 Python 的时候也有这个问题,基本类型一般没啥问题,要是来点类实例和列表混合,要索引指定下标的时候,代码补全就会摆烂,不过 Python 可以支持类型声明,这样语法提示也能很好的工作。ts 感觉就是弥补这一点,可以添加类型声明,这样 IDE 可以根据声明的类型来推断如何进行代码补全。
下面是使用示例
文件结构
src
|
|---types
|    |
|    |--- index.ts
|
|---App.vue
一般将自定义的类型放在 types 目录下,如果模块名是 index.ts,导入的时候只需要指定所在文件夹名就行
index.ts
// 定义一个接口
export interface Person {
    name: string,
    age: number,
}

// 一个数组类型
export type Persons = Person[]
App.vue
<script setup lang="ts">
// 导入类型需要加关键词 type
// @ 符号表示路径 /src
import type { Person, Persons } from '@/types';

// 通过冒号声明类型

// Person 对象
const p1: Person = {
    name: 'John',
    age: 30,
}

// Person 对象数组
const p2: Persons = [
    { name: 'Alice', age: 25 },
    { name: 'Bob', age: 35}
]

// 数字类型
const value: number = 1
</script>
生命周期
生命周期钩子参考:https://cn.vuejs.org/api/composition-api-lifecycle.html
图片来源于官方文档:https://cn.vuejs.org/guide/essentials/lifecycle.html
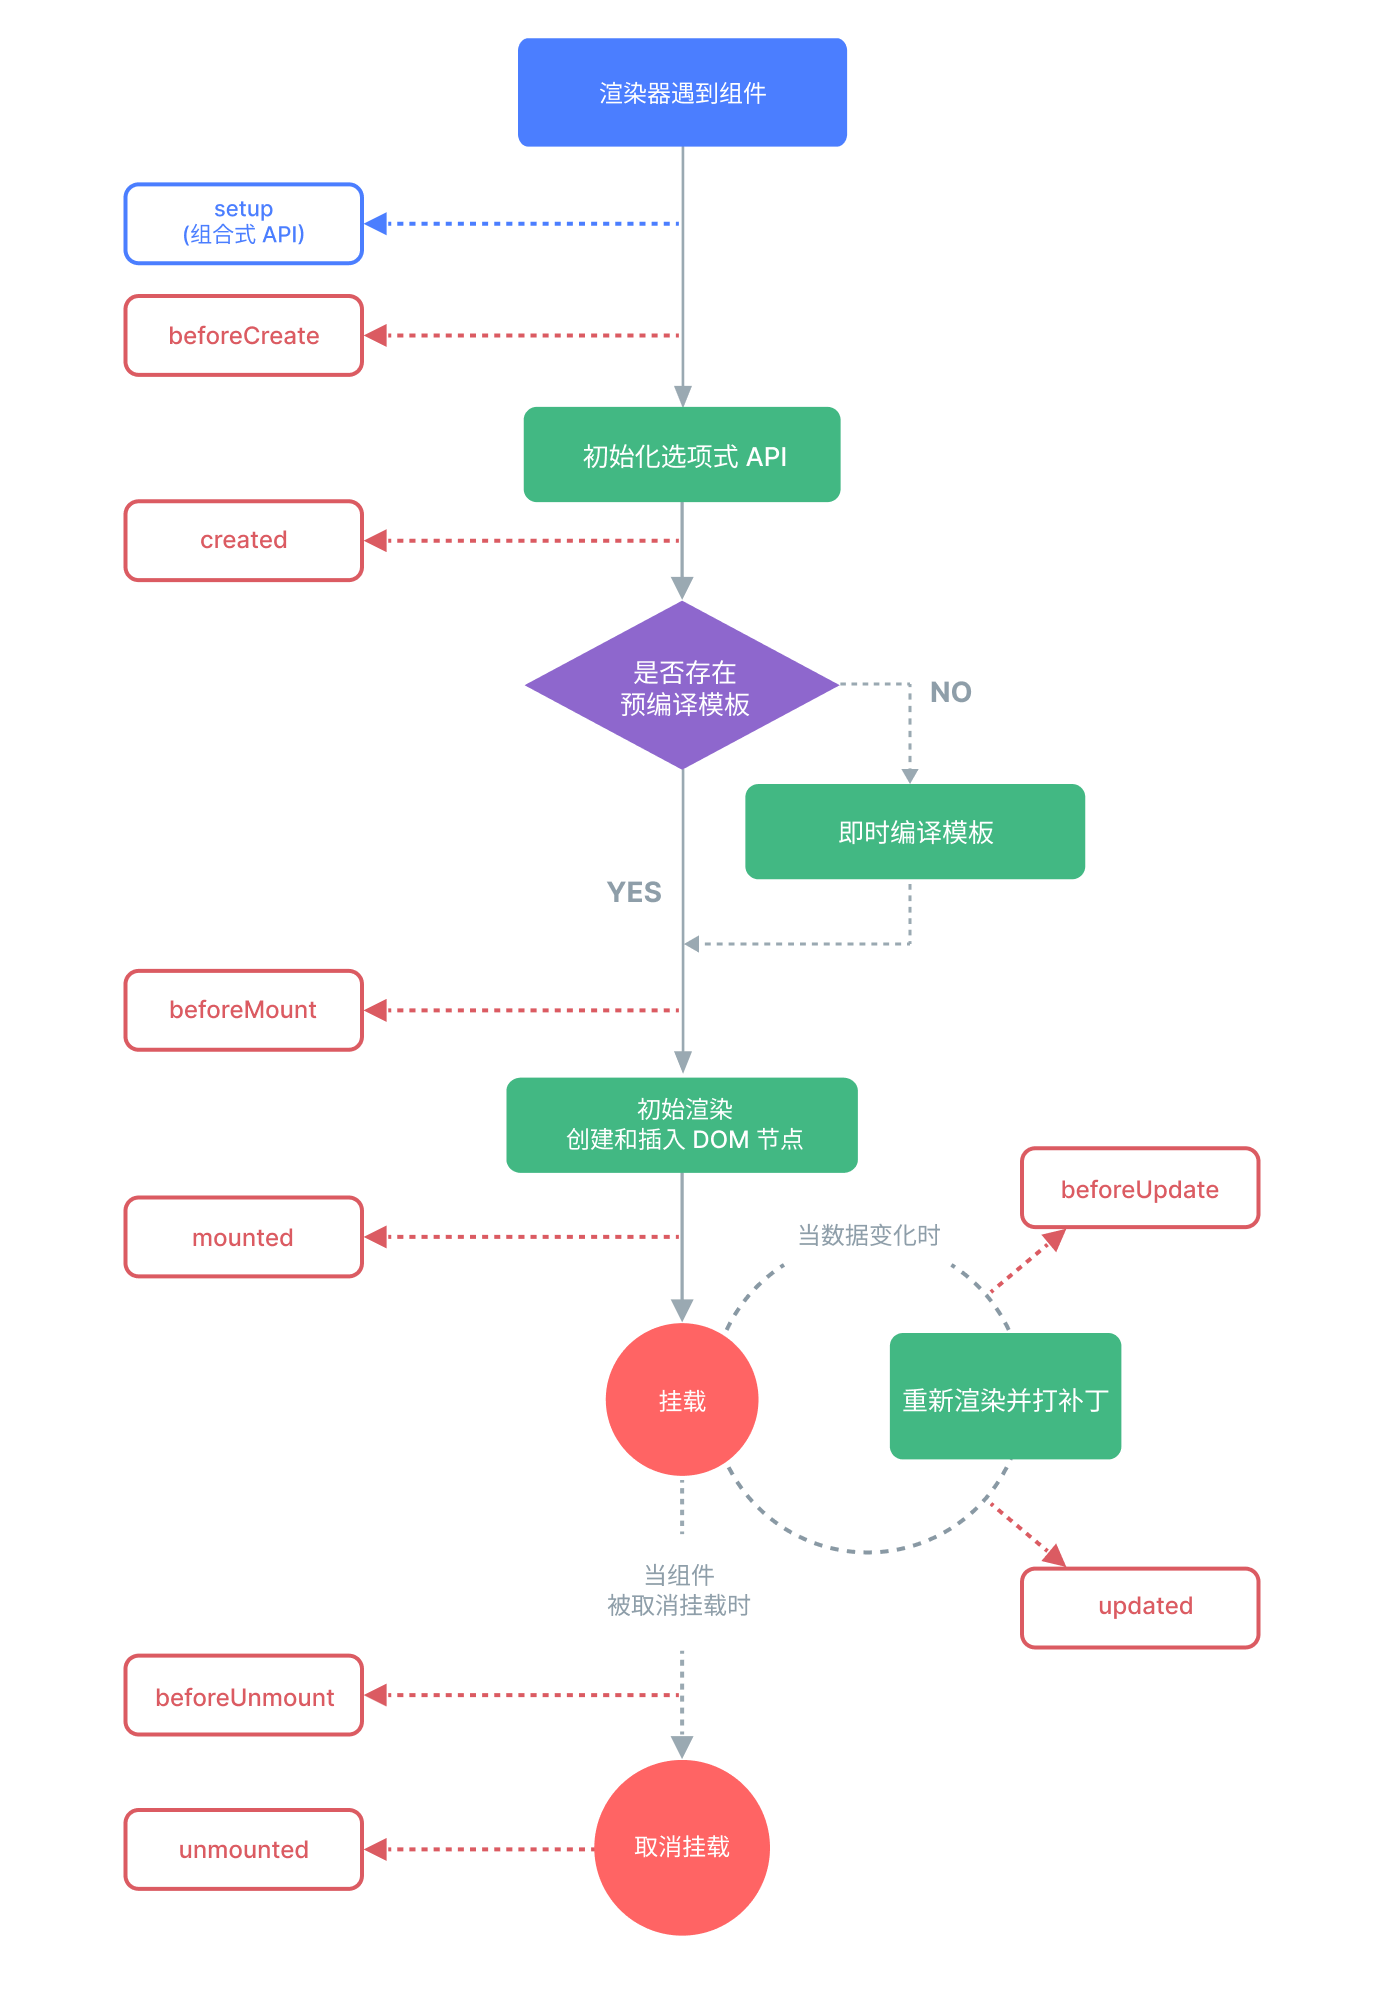
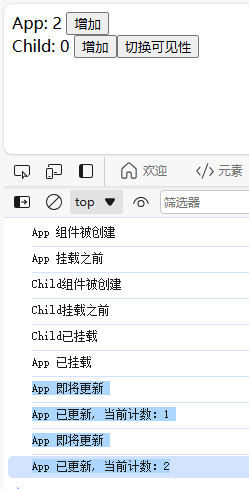
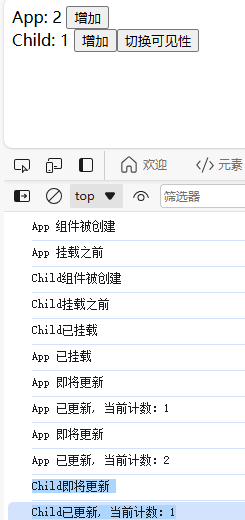
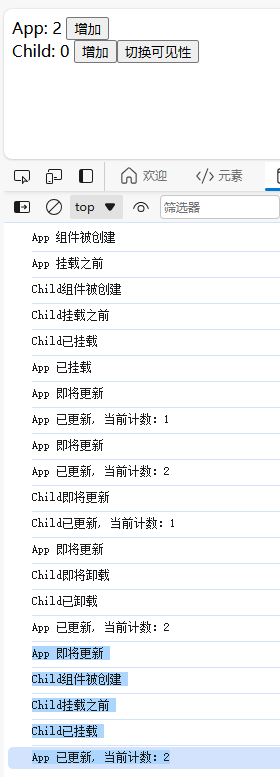
下面是演示:
文件结构
src
|
|---components
|    |
|    |
|    |---Child.Vue
|
|---App.vue
Child.Vue
<script setup lang="ts">
import { onBeforeMount, onBeforeUnmount, onBeforeUpdate, onErrorCaptured, onMounted, onUnmounted, onUpdated, ref } from 'vue';

let count = ref(0);

function increment() {
    count.value++;
}

console.log('Child组件被创建')

// 组件挂载后执行
onMounted(() => {
    console.log('Child已挂载')
});

// 组件更新后执行
onUpdated(() => {
    console.log('Child已更新, 当前计数:' + count.value)
});

// 组件卸载后执行
onUnmounted(() => {
    console.log('Child已卸载')
});

// 组件挂载之前执行
onBeforeMount(() => {
    console.log('Child挂载之前')
});

// 组件即将更新前
onBeforeUpdate(() => {
    console.log('Child即将更新')
});

// 组件被卸载之前
onBeforeUnmount(() => {
    console.log('Child即将卸载')
});

onErrorCaptured((err, instance, info) => {
    console.log('Child捕获到错误:' + err)
    console.log('组件实例:' + instance)
    console.log('错误信息:' + info)
});
</script>

<template>
    Child: {{ count }}
    <button @click="increment">增加</button>
</template>
<script setup lang="ts">
import Child from '@/components/Child.vue';
import { onBeforeMount, onBeforeUnmount, onBeforeUpdate, onErrorCaptured, onMounted, onUnmounted, onUpdated, ref } from 'vue';
let count = ref(0);
let isVisible = ref(true);
function increment() {
count.value++;
}
function switchVisibility() {
isVisible.value = !isVisible.value;
}
console.log('App 组件被创建');
// 组件挂载后执行
onMounted(() => {
console.log('App 已挂载')
});
// 组件更新后执行
onUpdated(() => {
console.log('App 已更新, 当前计数:' + count.value)
});
// 组件卸载后执行
onUnmounted(() => {
console.log('App 已卸载')
});
// 组件挂载之前执行
onBeforeMount(() => {
console.log('App 挂载之前')
});
// 组件即将更新前
onBeforeUpdate(() => {
console.log('App 即将更新')
});
// 组件被卸载之前
onBeforeUnmount(() => {
console.log('App 即将卸载')
});
// 捕获子组件的错误
onErrorCaptured((err, instance, info) => {
console.log('App 捕获到错误:' + err)
console.log('组件实例:' + instance)
console.log('错误信息:' + info)
});
</script>
<template>
App: {{ count }}
<button @click="increment">增加</button>
<br>
<Child v-if="isVisible"/>
<button @click="switchVisibility">切换可见性</button>
</template>启动后
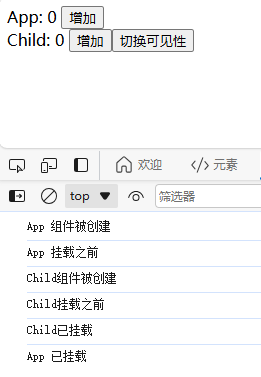
点击两次 App 增加
点击一次 Child 增加
点击一次切换可见性

再点一次切换可见性
路由
在创建项目的时候选引入 Router

或者后期安装
npm i vue-router体验
文件结构
src
|
|---components
|     Home.vue
|     Hello.vue
|     About.vue
|
|---router
|     index.ts
|
| App.vue
| main.ts
main.ts
<template>
    <div class="navigate">
        <RouterLink to="/home" active-class="active">首页</RouterLink>
        <RouterLink to="/hello" active-class="active">你好</RouterLink>
        <RouterLink to="/about" active-class="active">关于</RouterLink>
    </div>
    <div class="routerView">
        <RouterView />
    </div>
</template>

<style scoped>
.navigate>* {
    border: 1px solid black;
    padding: 5px 10px;
}

.active {
    background-color: lightblue;
}

.routerView {
    border: 1px solid black;
    margin-top: 10px;
    padding: 10px;
}
</style>
index.ts
import { createRouter, createWebHistory } from "vue-router";

import Home from '@/components/Home.vue'
import Hello from "@/components/Hello.vue";
import About from "@/components/About.vue";

const router = createRouter({
    history: createWebHistory(),
    routes: [
        {
            path: '/home',
            component: Home
        },
        {
            path: '/hello',
            component: Hello
        },
        {
            path: '/about',
            component: About
        }
    ]
})

export default router
Home.vue
<template>
    <h1>Home</h1>
</template>
Hello.vue
<template>
    <h1>Hello</h1>
</template>
About.vue
<template>
    <h1>About</h1>
</template>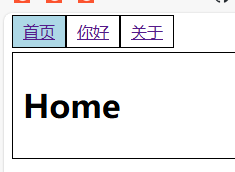
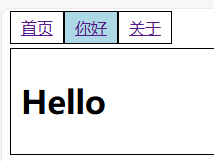
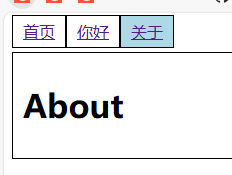
RouterLink to 对象写法
路径
App.vue 中 template 部分
<template>
    <div class="navigate">
        <RouterLink :to="{ path: '/home' }" active-class="active">首页</RouterLink>
        <RouterLink :to="{ path: '/hello' }" active-class="active">你好</RouterLink>
        <RouterLink :to="{ path: '/about' }" active-class="active">关于</RouterLink>
    </div>
    <div class="routerView">
        <RouterView />
    </div>
</template>
名字
index.ts
import { createRouter, createWebHistory } from "vue-router";

import Home from '@/components/Home.vue'
import Hello from "@/components/Hello.vue";
import About from "@/components/About.vue";

const router = createRouter({
    history: createWebHistory(),
    routes: [
        {
            name: 'homeRoute',
            path: '/home',
            component: Home
        },
        {
            name: 'helloRoute',
            path: '/hello',
            component: Hello
        },
        {
            name: 'aboutRoute',
            path: '/about',
            component: About
        }
    ]
})

export default router
App.vue 中 template 部分
<template>
    <div class="navigate">
        <RouterLink :to="{ name: 'homeRoute' }" active-class="active">首页</RouterLink>
        <RouterLink :to="{ name: 'helloRoute' }" active-class="active">你好</RouterLink>
        <RouterLink :to="{ name: 'aboutRoute' }" active-class="active">关于</RouterLink>
    </div>
    <div class="routerView">
        <RouterView />
    </div>
</template>
参数
文件结构
src
│  App.vue
│  main.ts
|
├─router
│      index.ts
|
└─views
        About.vue
        Detail.vue
        Hello.vue
        Home.vue
query 参数
query 通过键值传参
url/path?key1=value1&key2=value2Home.vue
<template>
    <h1>Home</h1>
</template>
About.vue
<template>
    <h1>About</h1>
</template>
Hello.vue
<script setup lang="ts">
import { ref } from 'vue';

const list = ref([
    { id: 1, title: '自我修养', content: '学会放弃' },
    { id: 2, title: '为什么学习', content: '不学习就会被淘汰' },
    { id: 3, title: '学习的关键', content: '理论和实践结合' }
])
</script>

<template>
    <div class="container">
        <div class="sidebar">
            <ul>
                <li v-for="item in list" :key="item.id">
                    <RouterLink :to="{
                        name: 'detail',
                        query: {
                            id: item.id,
                            title: item.title,
                            content: item.content
                        }
                    }">
                        {{ item.title }}
                    </RouterLink>
                </li>
            </ul>
        </div>
        <div class="main">
            <RouterView />
        </div>
    </div>
</template>

<style scoped>
.container {
    display: flex;
}

.sidebar {
    flex: 1;
    padding: 20px;
}

.main {
    flex: 3;
    padding: 20px;
}
</style>
Detail.vue
<script setup lang="ts">
import { toRefs } from 'vue';
import { useRoute } from 'vue-router';

let { query } = toRefs(useRoute())
</script>

<template>
    <ul>
        <li>ID: {{ query.id }}</li>
        <li>Title: {{ query.title }}</li>
        <li>Content: {{ query.content }}</li>
    </ul>
</template>
index.ts
import { createRouter, createWebHistory } from "vue-router";

const router = createRouter({
    history: createWebHistory(),
    routes: [
        {
            name: 'home',
            path: '/home',
            component: () => import('@/views/Home.vue')
        },
        {
            name: 'hello',
            path: '/hello',
            component: () => import('@/views/Hello.vue'),
            children: [
                {
                    name: 'detail',
                    path: '/detail',
                    component: () => import('@/views/Detail.vue')
                }
            ]
        },
        {
            name: 'about',
            path: '/about',
            component: () => import('@/views/About.vue')
        }
    ]
})

export default router
App.vue
<template>
    <div class="navigate">
        <RouterLink :to="{ name: 'home' }" active-class="active">首页</RouterLink>
        <RouterLink :to="{ name: 'hello' }" active-class="active">你好</RouterLink>
        <RouterLink :to="{ name: 'about' }" active-class="active">关于</RouterLink>
    </div>
    <div class="routerView">
        <RouterView />
    </div>
</template>

<style scoped>
.navigate>* {
    border: 1px solid black;
    padding: 5px 10px;
}

.active {
    background-color: lightblue;
}

.routerView {
    border: 1px solid black;
    margin-top: 10px;
    padding: 10px;
}
</style>
main.ts
import { createApp } from 'vue'
import App from './App.vue'
import router from '@/router'

const app = createApp(App)

app.use(router)
app.mount('#app')


params 参数
params 通过路径传参
url/path/value1/value2在 query 源码基础上修改过的文件
Detail.vue
<script setup lang="ts">
import { toRefs } from 'vue';
import { useRoute } from 'vue-router';

let { params } = toRefs(useRoute())
</script>

<template>
    <ul>
        <li>ID: {{ params.id }}</li>
        <li>Title: {{ params.title }}</li>
        <li>Content: {{ params.content }}</li>
    </ul>
</template>
index.ts
import { createRouter, createWebHistory } from "vue-router";

const router = createRouter({
    history: createWebHistory(),
    routes: [
        {
            name: 'home',
            path: '/home',
            component: () => import('@/views/Home.vue')
        },
        {
            name: 'hello',
            path: '/hello',
            component: () => import('@/views/Hello.vue'),
            children: [
                {
                    name: 'detail',
                    path: '/detail/:id/:title/:content', // 路径加上占位符
                    component: () => import('@/views/Detail.vue')
                }
            ]
        },
        {
            name: 'about',
            path: '/about',
            component: () => import('@/views/About.vue')
        }
    ]
})

export default router
Hello.vue
<script setup lang="ts">
import { ref } from 'vue';

const list = ref([
    { id: 1, title: '自我修养', content: '学会放弃' },
    { id: 2, title: '为什么学习', content: '不学习就会被淘汰' },
    { id: 3, title: '学习的关键', content: '理论和实践结合' }
])
</script>

<template>
    <div class="container">
        <div class="sidebar">
            <ul>
                <li v-for="item in list" :key="item.id">
                    <RouterLink :to="{
                        name: 'detail',
                        params: {
                            id: item.id,
                            title: item.title,
                            content: item.content
                        }
                    }">
                        {{ item.title }}
                    </RouterLink>
                </li>
            </ul>
        </div>
        <div class="main">
            <RouterView />
        </div>
    </div>
</template>

<style scoped>
.container {
    display: flex;
}

.sidebar {
    flex: 1;
    padding: 20px;
}

.main {
    flex: 3;
    padding: 20px;
}
</style>
props
Detail.vue
<script setup lang="ts">
defineProps(['id', 'title', 'content'])
</script>

<template>
    <ul>
        <li>ID: {{ id }}</li>
        <li>Title: {{ title }}</li>
        <li>Content: {{ content }}</li>
    </ul>
</template>
方式一 props 选项
只能结合 params 传参
index.ts
import { createRouter, createWebHistory } from "vue-router";

const router = createRouter({
    history: createWebHistory(),
    routes: [
        {
            name: 'home',
            path: '/home',
            component: () => import('@/views/Home.vue')
        },
        {
            name: 'hello',
            path: '/hello',
            component: () => import('@/views/Hello.vue'),
            children: [
                {
                    name: 'detail',
                    path: '/detail/:id/:title/:content',
                    component: () => import('@/views/Detail.vue'),
                    props: true // params 所有参数传递
                }
            ]
        },
        {
            name: 'about',
            path: '/about',
            component: () => import('@/views/About.vue')
        }
    ]
})

export default router
方式二 props 函数
可以使用 query 或 params 传参,方式三也是,这里举例用 query
Hello.vue
<script setup lang="ts">
import { ref } from 'vue';

const list = ref([
    { id: 1, title: '自我修养', content: '学会放弃' },
    { id: 2, title: '为什么学习', content: '不学习就会被淘汰' },
    { id: 3, title: '学习的关键', content: '理论和实践结合' }
])
</script>

<template>
    <div class="container">
        <div class="sidebar">
            <ul>
                <li v-for="item in list" :key="item.id">
                    <RouterLink :to="{
                        name: 'detail',
                        query: {
                            id: item.id,
                            title: item.title,
                            content: item.content
                        }
                    }">
                        {{ item.title }}
                    </RouterLink>
                </li>
            </ul>
        </div>
        <div class="main">
            <RouterView />
        </div>
    </div>
</template>

<style scoped>
.container {
    display: flex;
}

.sidebar {
    flex: 1;
    padding: 20px;
}

.main {
    flex: 3;
    padding: 20px;
}
</style>
index.ts
import { createRouter, createWebHistory } from "vue-router";

const router = createRouter({
    history: createWebHistory(),
    routes: [
        {
            name: 'home',
            path: '/home',
            component: () => import('@/views/Home.vue')
        },
        {
            name: 'hello',
            path: '/hello',
            component: () => import('@/views/Hello.vue'),
            children: [
                {
                    name: 'detail',
                    path: '/detail',
                    component: () => import('@/views/Detail.vue'),
                    props(route) { // 函数传递
                        return route.query
                    }
                }
            ]
        },
        {
            name: 'about',
            path: '/about',
            component: () => import('@/views/About.vue')
        }
    ]
})

export default router
方式三 props 对象
index.js
import { createRouter, createWebHistory } from "vue-router";

const router = createRouter({
    history: createWebHistory(),
    routes: [
        {
            name: 'home',
            path: '/home',
            component: () => import('@/views/Home.vue')
        },
        {
            name: 'hello',
            path: '/hello',
            component: () => import('@/views/Hello.vue'),
            children: [
                {
                    name: 'detail',
                    path: '/detail',
                    component: () => import('@/views/Detail.vue'),
                    props: (route) => route.query // 传递一个对象,这里写成箭头表达式是为了获取 query 对象,可以直接写一个要传递的对象
                }
            ]
        },
        {
            name: 'about',
            path: '/about',
            component: () => import('@/views/About.vue')
        }
    ]
})

export default router
浏览历史记录:push 和 replace 模式
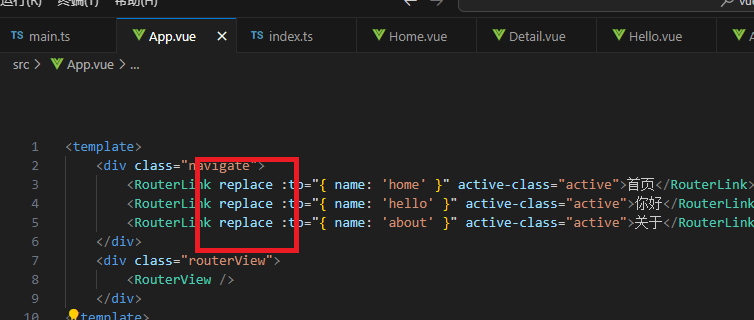
默认是 push 模式,在页面内跳转路由后,浏览器会记录每个路由地址,可以通过历史记录前进后退。如果在指定的路由链接设置 replace 模式,则在该路由跳转后覆盖,不会保留每次的浏览器路由地址。
给导航按扭设置 replace 属性后,在点击导航按扭切换后不会保留历史记录
编程式路由导航
前面实现跳转是在 template 中写 RouterLink 组件,但是要想在 script 中通过一定的逻辑控制跳转就得使用另外一套。
下面的例子进行重写,将导航按扭由 RouterLink 换成按扭,通过点击事件控制跳转到对应页面,另外在 /home 页面设置一个延迟执行,2s 后跳转到 /hello 页面。另外取消 /hello 页面的 RouterLink 点击标题显示详情,改为标题前显示按扭,点击按扭查看详情。
App.vue
<script setup lang="ts">
import { useRouter } from 'vue-router';

let router = useRouter()

function navigateTo(name: string) {
    router.push({ name: name }) // push 模式
}
</script>

<template>
    <!-- 使用按扭来导航 -->
    <button @click="navigateTo('home')">首页</button>
    <button @click="navigateTo('hello')">你好</button>
    <button @click="navigateTo('about')">关于</button>
    <div class="routerView">
        <RouterView />
    </div>
</template>

<style scoped>
.routerView {
    border: 1px solid black;
    margin-top: 10px;
    padding: 10px;
}
</style>
Home.vue
<script setup lang="ts">
import { onMounted } from 'vue';
import { useRouter } from 'vue-router';

let router = useRouter()

// 2s 后跳转到 hello 页面
onMounted(() => {
    setTimeout(() => {
        router.push('/hello')
    }, 2000)
})
</script>

<template>
    <h1>Home</h1>
</template>
Hello.vue
<script setup lang="ts">
import { ref } from 'vue';
import { useRouter } from 'vue-router';

interface ItemType {
    id: number;
    title: string;
    content: string;
}

const list = ref<ItemType[]>([
    { id: 1, title: '自我修养', content: '学会放弃' },
    { id: 2, title: '为什么学习', content: '不学习就会被淘汰' },
    { id: 3, title: '学习的关键', content: '理论和实践结合' }
])

let router = useRouter()

function getDetail(item: ItemType) {
    router.push({
        name: 'detail',
        query: {
            id: item.id,
            title: item.title,
            content: item.content
        }
    })
}
</script>

<template>
    <div class="container">
        <div class="sidebar">
            <ul>
                <li v-for="item in list" :key="item.id">
                    <button @click="getDetail(item)">点击阅读详情</button>
                    {{ item.title }}
                </li>
            </ul>
        </div>
        <div class="main">
            <RouterView />
        </div>
    </div>
</template>

<style scoped>
.container {
    display: flex;
}

.sidebar {
    flex: 1;
    padding: 20px;
}

.main {
    flex: 3;
    padding: 20px;
}
</style>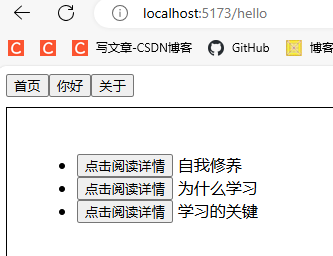

重定向
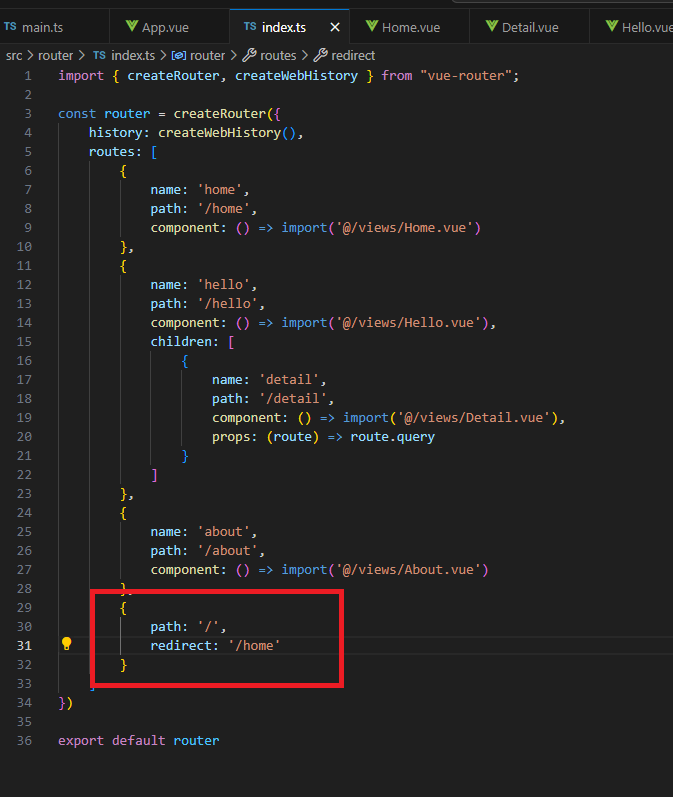
比如访问 / 自动跳转到 /home
组件通信
props 父传子
文件结构
└─src
    │  App.vue
    │  main.ts
    │
    └─components
            Child.vue
Child.vue
<script setup lang="ts">
const props = defineProps(['testProps1', 'testProps2'])
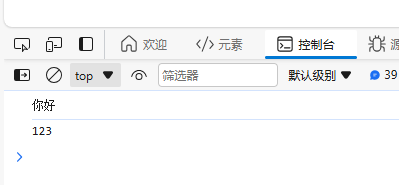
console.log(props.testProps1) // js 使用需要通过 defineProps 返回值
console.log(props.testProps2)
</script>

<template>
    <!-- template 中使用可以直接用 props 名字 -->
    <p>{{ testProps1 }}</p>
    <p>{{ testProps2 }}</p>
</template>
App.vue
<script setup lang="ts">
import Child from '@/components/Child.vue';

const myString = '123'
</script>

<template>
    <!-- 调用子组件并传递数据 -->
    <!-- 如果要取变量的值,属性需要加上冒号 -->
    <Child testProps1="你好" :testProps2="myString" />
</template>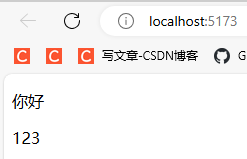
事件 子传父
原生 DOM 事件
App.vue
<script setup lang="ts">
import { ref } from 'vue';

let status = ref('')

function handler1() {
    status.value = '按扭 1 被点击'
}

function handler2(event: any) {
    status.value = '按扭 2 事件,类型:' + event.type + ' 目标:' + event.target.tagName
}

function handler3(p1: string, p2: string, event: any) {
    status.value = '按扭 3 事件,类型:' + event.type + ' 目标:' + event.target.tagName + ' *** ' + p1 + ' ' + p2
}
</script>

<template>
    <p>{{ status }}</p>
    <button @click="handler1">按扭 1</button>
    <button @click="handler2($event)">按扭 2</button>
    <button @click="handler3('测试参数1', '测试参数2', $event)">按扭 3</button>
</template>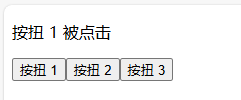


自定义事件
Child.vue
<script setup lang="ts">

// 定义事件
// click 是原生事件,可以重写
// 返回值是一个箭头函数
let emits = defineEmits(['myEvent1', 'click'])
</script>

<template>
    <!-- 第一个参数是时间名,后面的是参数,可以传给父组件 -->
    <button @click="emits('myEvent1', '自定义事件', 'a1', 'a2', 'a3')">触发自定义事件</button>
    <hr>
    <button @click="emits('click', '重写点击事件', 'b1')">触发重写的点击事件</button>
</template>
App.vue
<script setup lang="ts">
import Child from './components/Child.vue';

function handler(...args: string[]) {
    args.forEach((arg: string) => {
        console.log(arg)
    })
    console.log('*'.repeat(100))
}
</script>

<template>
    <Child @myEvent1="handler" @click="handler" />
</template>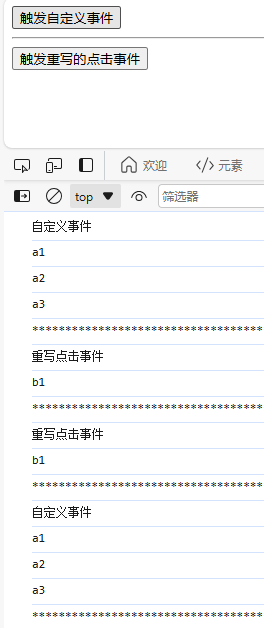
v-model 父子互传
收集表单数据
App.vue
<script setup lang="ts">
import { ref } from 'vue';

const info = ref(null)
</script>

<template>
    <p>输入的内容是:{{ info }}</p>
    <hr>
    <input type="text" v-model="info" />
</template>
父子组件传值
在 Vue 3.4 版本开始,提供了 defineModel 来实现值传递,底层用的是 props 和自定义事件,在 3.4 以前的版本是需要自己写
App.vue
<script setup lang="ts">
import { ref } from 'vue';
import Child1 from './components/Child1.vue';
import Child2 from './components/Child2.vue';

const value1 = ref(0)
const value2 = ref(1)
const value3 = ref(1)
</script>

<template>
    <div>
        {{ value1 }}
        <!-- 会自动添加 update:modelValue 事件 -->
        <Child1 v-model="value1" />
    </div>
    <div>
        {{ value2 }} - {{ value3 }}
        <!-- 会自动添加 update:value2 和 update:value3 事件 -->
        <Child2 v-model:value2="value2" v-model:value3="value3" />
    </div>
</template>
Child1.vue
<script setup lang="ts">
import { ref } from 'vue';

// 默认 props 名为 modelValue
const [ modelValue ]= defineModel({
    type: Number,
    default: 0
})

const emit = defineEmits(['update:modelValue']) // 定义事件
</script>

<template>
    <div>
        <button @click="emit('update:modelValue', modelValue + 1)">按扭1</button>
    </div>
</template>
Child2.vue
<script setup lang="ts">
import { ref } from 'vue';

const [ value2 ]= defineModel('value2', {
    type: Number,
    default: 0
})

const [ value3 ] = defineModel('value3', {
    type: Number,
    default: 0
})

const emit = defineEmits(['update:value2', 'update:value3'])
</script>

<template>
    <div>
        <button @click="emit('update:value2', value2 * 2)">按扭2</button>
        <button @click="emit('update:value3', value3 * 3)">按扭3</button>
    </div>
</template>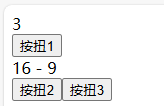
defineExpose
ref 属性
Child.vue
<template>
    <h1>我是儿子</h1>
</template>
App.vue
<script setup lang="ts">
import { onMounted, ref } from 'vue';
import Child from './components/Child.vue';

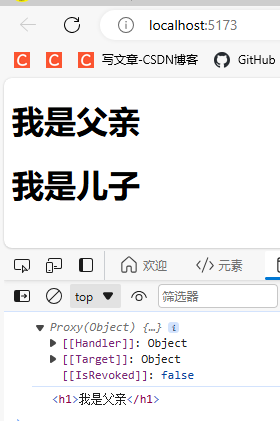
const child = ref(null)
const parent = ref(null)

onMounted(() => {
    console.log(child.value)
    console.log(parent.value)
})
</script>

<template>
    <h1 ref="parent">我是父亲</h1>
    <Child ref="child" />
</template>
在组件或标签中加上 ref 属性,并声明一个 ref 的同名变量,通过变量可以获得组件或 DOM 元素
父组件获取子组件数据
Child.vue
<script setup lang="ts">
import { ref } from 'vue';

const money = ref(0)

// 暴露
defineExpose({
    money
})
</script>

<template>
    孩子余额:{{ money }}
</template>
App.vue
<script setup lang="ts">
import { ref } from 'vue';
import Child from './components/Child.vue';

const money = ref(1000000)
const child = ref()

function giveMoney() {
    child.value.money += 100 // 修改子组件 money 值
    money.value -= 100
}
</script>

<template>
    父亲余额:{{ money }}
    <hr>
    <Child ref="child" />
    <hr>
    <button @click="giveMoney">给孩子钱</button>
</template>
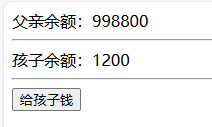
在父组件可以获取子组件变量,且可以修改
子组件获取父组件数据
Child.vue
<script setup lang="ts">
import { ref } from 'vue';

const money = ref(0)

// 通过 $parent 访问父组件
function receiveMoney($parent: any) {
    $parent.money -= 100
    money.value += 100
}

</script>

<template>
    孩子余额:{{ money }}
    <hr>
    <button @click="receiveMoney($parent)">收到钱</button>
</template>
App.vue
<script setup lang="ts">
import { ref } from 'vue';
import Child from './components/Child.vue';

const money = ref(1000000)

// 暴露
defineExpose({
    money
})
</script>

<template>
    父亲余额:{{ money }}
    <hr>
    <Child ref="child" />
</template>
provide – inject
使用 provide 和 inject 可以在父子以及隔代组件之间传递数据
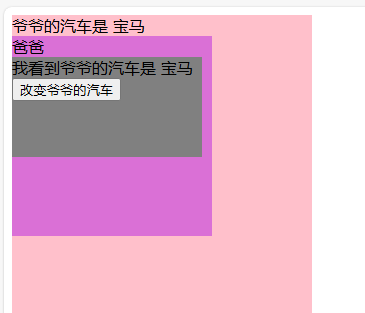
下面的例子,“爷爷”有一辆车,“孙子”可以获取“爷爷”的车以及修改
Me.vue
<script setup lang="ts">
import { inject, type Ref } from 'vue';

// 注入
const grandfatherCar = inject<any>('grandfatherCar')

function changeGrandfatherCar() {
    grandfatherCar.value = '宝马'
}
</script>

<template>
    <div class="me">
        我看到爷爷的汽车是 {{ grandfatherCar }}
        <button @click="changeGrandfatherCar">改变爷爷的汽车</button>
    </div>
</template>

<style scoped>
.me {
    width: 190px;
    height: 100px;
    background-color: gray;
}
</style>
Father.vue
<script setup lang="ts">
import Me from './Me.vue'
</script>

<template>
    <div class="father">
        爸爸
        <Me />
    </div>
</template>

<style scoped>
.father {
    width: 200px;
    height: 200px;
    background-color: orchid;
}
</style>
App.vue
<script setup lang="ts">
import { provide, ref } from 'vue';
import Father from './components/Father.vue';

const car = ref('奔驰')

// 提供
provide('grandfatherCar', car)
</script>

<template>
    <div class="grandfather">
        爷爷的汽车是 {{ car }}
        <Father />
    </div>
</template>

<style scoped>
.grandfather {
    width: 300px;
    height: 300px;
    background-color: pink;
}
</style>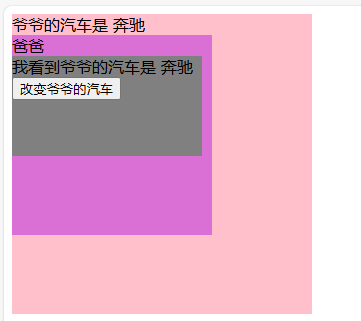
插槽
默认插槽 父传子
Child.vue
<template>
    <div class="child">
        我是子组件
        <br>
        <!-- 用 slot 接受父组件给过来的内容 -->
        父组件传给我的内容:<slot></slot>
    </div>
</template>

<style scoped>
.child {
    width: 290px;
    height: 200px;
    background-color: pink;
}
</style>
App.vue
<template>
    <div class="main">
        我是父组件
        <!-- 传给子组件的内容 -->
        <Child>Hello world</Child>
    </div>
</template>

<script setup langg="ts">
    import Child from './components/Child.vue';
</script>

<style scoped>
    .main {
        width: 300px;
        height: 250px;
        background-color: aqua;
    }
</style>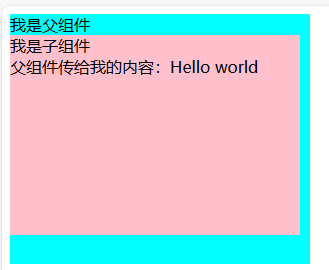
具名插槽 父传子
Child.vue
<template>
    <div class="child">
        我是子组件
        <br>
        <div class="slot">
            <!-- 多个插槽可以用 name 添加名字 -->
            <slot name="testSlot1"></slot>
            <br>
            <slot name="testSlot2"></slot>
        </div>
    </div>
</template>

<style scoped>
.child {
    width: 290px;
    height: 200px;
    background-color: pink;
}

.slot {
    width: 280px;
    height: 150px;
    background-color: skyblue;
}
</style>
App.vue
<template>
    <div class="main">
        我是父组件
        <Child>
            <!-- 通过井号加名字传给指定插槽 -->
            <template #testSlot1>
                插入第一个插槽的内容
            </template>
            <template #testSlot2>
                插入第二个插槽的内容
            </template>
        </Child>
    </div>
</template>

<script setup langg="ts">
    import Child from './components/Child.vue';
</script>

<style scoped>
    .main {
        width: 300px;
        height: 250px;
        background-color: aqua;
    }
</style>
作用域插槽 子传父
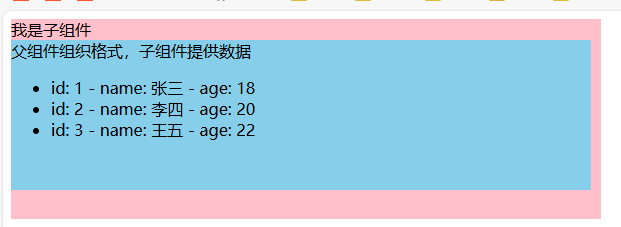
直观体现是子传给了父,实际是父定义一套格式,并把这套格式交给子组件用于呈现数据
Child.vue
<template>
    <div class="child">
        我是子组件
        <br>
        <div class="slot">
            父组件组织格式,子组件提供数据
            <ul>
                <li v-for="(item, index) in chidlData" :key="item.id">
                    <!-- 向父组件传递数据 -->
                    <slot :row="item"></slot>
                </li>
            </ul>
        </div>
    </div>
</template>

<script setup lang="ts">
import { ref } from 'vue'

const chidlData = ref([
    {
        id: 1,
        name: '张三',
        age: 18
    },
    {
        id: 2,
        name: '李四',
        age: 20
    },
    {
        id: 3,
        name: '王五',
        age: 22
    }
])
</script>

<style scoped>
.child {
    width: 590px;
    height: 200px;
    background-color: pink;
}

.slot {
    width: 580px;
    height: 150px;
    background-color: skyblue;
}
</style>
App.vue
<template>
    <div>
        <Child>
            <!-- 接受来自子组件的数据 -->
            <template v-slot="dataFromChild">
                id: {{ dataFromChild.row.id }} - name: {{ dataFromChild.row.name }} - age: {{ dataFromChild.row.age }}
            </template>
        </Child>
    </div>
</template>

<script setup langg="ts">
import Child from './components/Child.vue';
</script>