最近更新于 2025-08-22 09:51
作为 https://blog.iyatt.com/?p=6815 续篇
目标使用平台:红米 AC2100 路由器(后面有提供我编译的固件,也包含其它一些路由器固件,详情阅读原篇)
编译环境:Ubuntu 20.04 x86_64 (Docker)
备注:准备好科学上网(全局代理); make menuconfig 配置中使用空格选中,星号为编译进固件,M 编译为 ipk 安装包; 如果使用 root 编译,先设置环境变量 export FORCE_UNSAFE_CONFIGURE=1
此文不再更新,后期变动还是请阅读原篇的日志。
编译固件
安装依赖
sudo apt update

sudo apt install -y ack antlr3 asciidoc autoconf automake autopoint binutils bison build-essential bzip2 ccache cmake cpio curl device-tree-compiler fastjar flex gawk gettext gcc-multilib g++-multilib git gperf haveged help2man intltool libc6-dev-i386 libelf-dev libglib2.0-dev libgmp3-dev libltdl-dev libmpc-dev libmpfr-dev libncurses5-dev libncursesw5-dev libreadline-dev libssl-dev libtool lrzsz mkisofs msmtp nano ninja-build p7zip p7zip-full patch pkgconf python2.7 python3 python3-pip libpython3-dev qemu-utils rsync scons squashfs-tools subversion swig texinfo uglifyjs upx-ucl unzip vim wget xmlto xxd zlib1g-dev
获取 OpenWrt 源码
# 官方版
git clone https://github.com/openwrt/openwrt.git --depth=1 --branch=openwrt-22.03
cd openwrt

# lede 版
git clone https://github.com/coolsnowwolf/lede.git --depth=1 --branch=20220716
cd lede
安装 feeds
./scripts/feeds update -a
./scripts/feeds install -a
添加 ua2f 模块源码
git clone https://github.com/Zxilly/UA2F.git package/UA2F --depth=1 --branch=20220902T135035
添加 rkp-ipid 模块源码
git clone https://github.com/CHN-beta/rkp-ipid.git package/rkp-ipid --depth=1
红米 AC2100 硬件平台设置
Target System–>MediaTek Ralink MIPS
Subtarget–>MT7621 based boards
Target Profile–>Xiaomi Redmi Router AC2100
配置编译 rdp-ipid
Kernel modules–>Other modules–>kmod-rkp-ipid
配置编译 ua2f
Network->Routing and Redirection->UA2F
配置编译 iptables 模块
Network–>Firewall–>选中:(原版建议全选 iptables-mode- 开头的)
- iptables-mod-filter
- iptables-mod-ipopt
- iptables-mod-u32
基本界面配置
LuCI–>Collections –> luci (lede 默认已选)
LuCI–>Modules–>Translations–>Chinese Simplified (zh_Hans) (lede 默认已选)
LuCI–>Modules–>luci-compat
LuCI–>Applications–>luci-app-ttyd
LuCI–>Themes–>xxxxx (根据需要自己选管理界面的主题,如果路由器储存太小,建议就维持默认的)
make menuconfig
内核编译配置
Networking support ->Networking options ->Network packet filtering framework (Netfilter) (要先选中再进去)->Core Netfilter Configuration -> 选中:
- Netfilter NFNETLINK interface
- Netfilter LOG over NFNETLINK interface
- Netfilter connection tracking support
- Connection tracking netlink interface
- NFQUEUE and NFLOG integration with Connection Tracking
make kernel_menuconfig -j$(nproc) V=cs
编译
make download -j$(nproc) V=cs
make -j$(nproc) V=cs
——————————————————————————————————————
使用配置说明
先给路由器刷 breed,参考:https://blog.iyatt.com/?p=6839
刷上编译好的固件,登录后台(openwrt.lan),没有密码直接点登录。
在系统-启动项,写入下面内容并提交
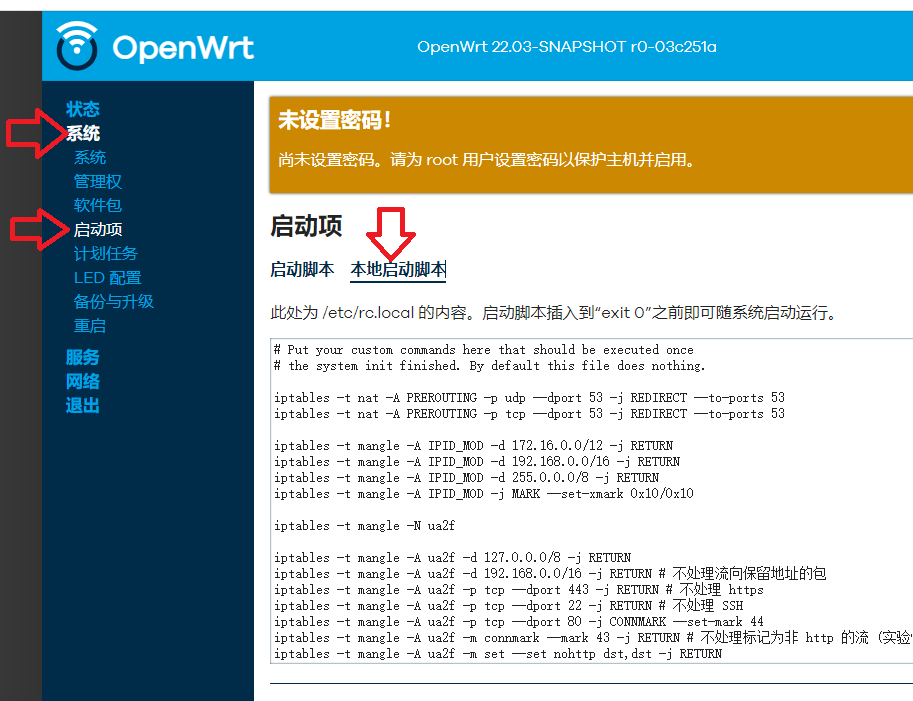
iptables -t nat -A PREROUTING -p udp --dport 53 -j REDIRECT --to-ports 53
iptables -t nat -A PREROUTING -p tcp --dport 53 -j REDIRECT --to-ports 53

# 防 IPID 检测
iptables -t mangle -N IPID_MOD
iptables -t mangle -A FORWARD -j IPID_MOD
iptables -t mangle -A OUTPUT -j IPID_MOD
iptables -t mangle -A IPID_MOD -d 0.0.0.0/8 -j RETURN
iptables -t mangle -A IPID_MOD -d 127.0.0.0/8 -j RETURN
# 由于本校局域网是 A 类网,所以我将这一条注释掉了,具体要不要注释结合你所在的校园网内网类型
# iptables -t mangle -A IPID_MOD -d 10.0.0.0/8 -j RETURN
iptables -t mangle -A IPID_MOD -d 172.16.0.0/12 -j RETURN
iptables -t mangle -A IPID_MOD -d 192.168.0.0/16 -j RETURN
iptables -t mangle -A IPID_MOD -d 255.0.0.0/8 -j RETURN
iptables -t mangle -A IPID_MOD -j MARK --set-xmark 0x10/0x10

# 防时钟偏移检测
iptables -t nat -N ntp_force_local
iptables -t nat -I PREROUTING -p udp --dport 123 -j ntp_force_local
iptables -t nat -A ntp_force_local -d 0.0.0.0/8 -j RETURN
iptables -t nat -A ntp_force_local -d 127.0.0.0/8 -j RETURN
iptables -t nat -A ntp_force_local -d 192.168.0.0/16 -j RETURN
iptables -t nat -A ntp_force_local -s 192.168.0.0/16 -j DNAT --to-destination 192.168.1.1

# 通过 iptables 修改 TTL 值
iptables -t mangle -A POSTROUTING -j TTL --ttl-set 64
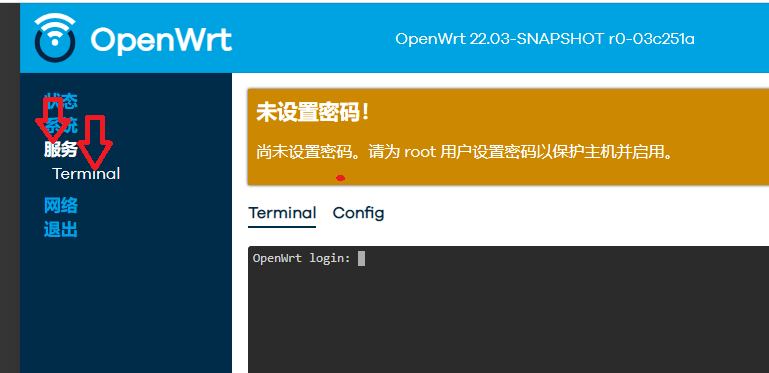
打开终端,用户名为 root,初始没有密码(和管理页面密码一样),输入用户名回车后登录终端
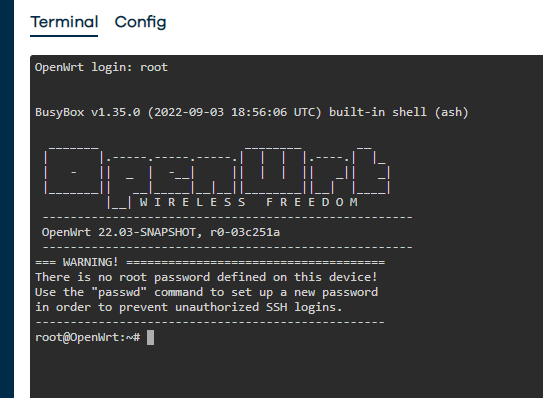
执行
uci set ua2f.enabled.enabled=1
uci set ua2f.firewall.handle_fw=1
uci set ua2f.firewall.handle_tls=1
uci set ua2f.firewall.handle_mmtls=1
uci set ua2f.firewall.handle_intranet=1
uci commit ua2f
service ua2f enable
service ua2f start
重启路由器
路由器启动后,登录校园网认证页面(202.202.145.132),连上路由器的设备就都有网了

———————————————————————————————————————————————
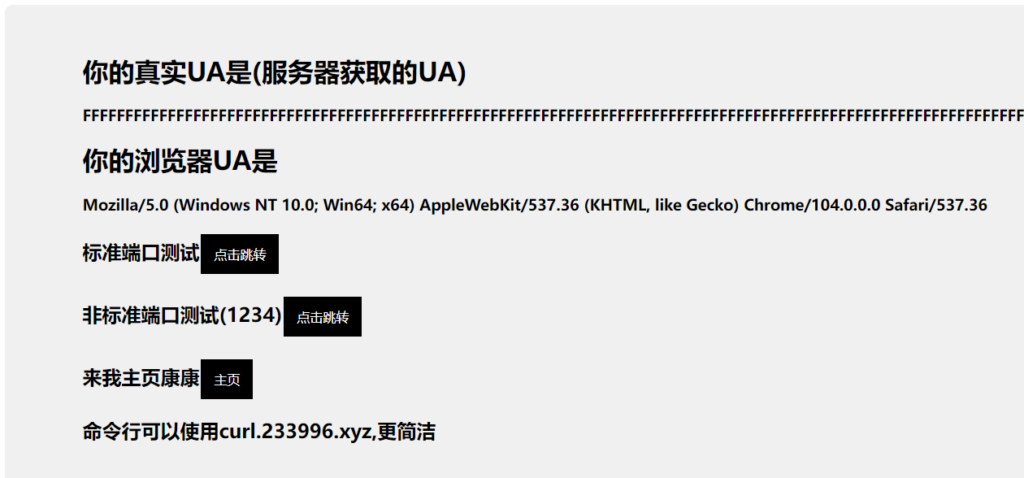
UA 测试:http://ua.233996.xyz/
————————————————————————————————————————————
固件下载:https://pan.baidu.com/s/1IJY2M9_DxH8vuo2AxWSaSA?pwd=w6tr
————————————————————————————————————————————
参考:
- https://sunbk201public.notion.site/sunbk201public/OpenWrt-f59ae1a76741486092c27bc24dbadc59
- https://github.com/tonytt0624/GDUF-Web/issues/3
- https://github.com/tonytt0624/GDUF-Web/issues/1
使用到的开源项目: