最近更新于 2025-07-14 07:18
测试环境
-
VScode: 1.101.2
-
PlatformIO:Core 6.1.18,Home 3.3.4
-
Espressif 32:6.11.0(工具链平台)
-
ESP32-WROOM-32(硬件,支持蓝牙 4.2 经典蓝牙和低功耗蓝牙)


蓝牙调试工具
- Android-nRF-Connect(Android手机端):https://github.com/NordicSemiconductor/Android-nRF-Connect/releases
资料
- Core Specification 4.2(核心规范 4.2,下称 Core):https://www.bluetooth.com/specifications/specs/core-specification-4-2/
- Specifications and documents(规范与文档):https://www.bluetooth.com/specifications/specs/
- Assigned Numbers(分配号码):https://www.bluetooth.com/specifications/assigned-numbers/
- GATT Specification Supplement(通用属性配置文件规范补充):https://www.bluetooth.com/specifications/gss/
- Device Properties(设备属性):https://www.bluetooth.com/specifications/specs/device-properties/
学习实践
信道
共 40 个信道,0、12、39 为广播信道,其它为数据信道

来源:Core Specification 4.2,BLUETOOTH SPECIFICATION Version 4.2 [Vol 6, Part B],1.4.1 Advertising and Data Channel Indices,
扫描设备
#include "Arduino.h"

#include "BLEDevice.h"
#include "BLEUtils.h"
#include "BLEScan.h"
#include "BLEAdvertisedDevice.h"

int scanTime = 5;  // 扫描持续时间,单位为秒
BLEScan *pBLEScan = nullptr;

class MyAdvertisedDeviceCallbacks : public BLEAdvertisedDeviceCallbacks
{
    void onResult(BLEAdvertisedDevice advertisedDevice)
    {
        Serial.printf("发现的设备:%s \n", advertisedDevice.toString().c_str());
    }
};

void setup()
{
    Serial.begin(115200);
    Serial.println("开始扫描...");

    BLEDevice::init("");
    pBLEScan = BLEDevice::getScan();  // 创建新的扫描对象
    pBLEScan->setAdvertisedDeviceCallbacks(new MyAdvertisedDeviceCallbacks()); // 发现蓝牙设备时执行的操作(回调函数)
    pBLEScan->setActiveScan(true);  // 设置主动扫描(主动扫描会消耗更多电量,但结果返回更快)
    pBLEScan->setInterval(100); // 两次扫描间隔的时间
    pBLEScan->setWindow(99);  // 每次扫描持续的时间(小于或等于 setInterval 的值)
}

void loop()
{
    // 下面代码循环执行
    BLEScanResults foundDevices = pBLEScan->start(scanTime);
    Serial.printf("\n发现设备数量:%d\n", foundDevices.getCount());
    pBLEScan->clearResults();  // 清除扫描结果,释放内存
    delay(2000);
}
服务器
BLE 采用“服务器(从机)-客户端(主机)”的工作模式,BLE 中可以添加多个服务,每个服务中可以添加多个特征值,服务器端设置特征值的读写属性。主机连接到从机,可以读取到特征值,一定条件下也可以修改特征值。
举个例子,比如可以监控心率的手环,手环就是服务器,手机就是客户端。首次使用时,手环广播,手机可以扫描到并进行连接,手环蓝牙提供了一个心率服务,服务中包含了一个心率特征,手环将测量的结果设置到心率特征的值里,手机读取这个值就能获取结果。
自定义 UUID
#include "Arduino.h"
#include "BLEDevice.h"
#include "BLEUtils.h"
#include "BLEServer.h"
// 可使用 https://www.uuidgenerator.net/ 来生成唯一的 UUID
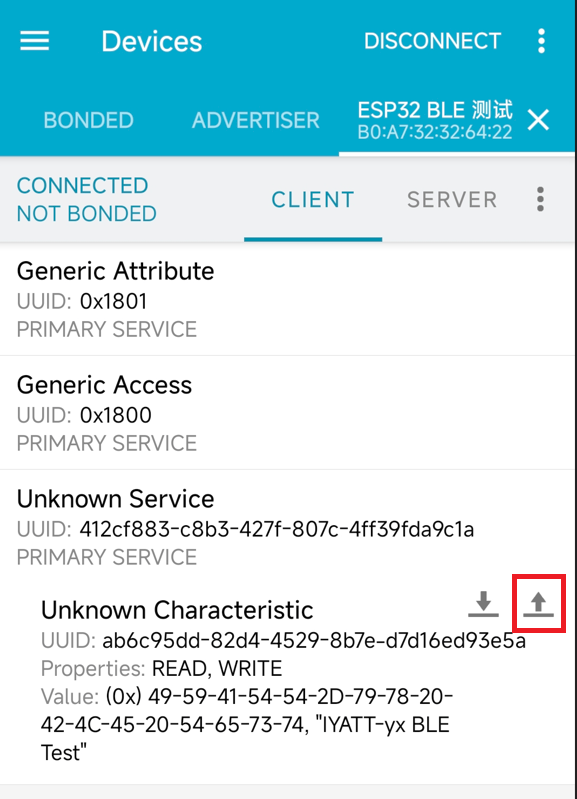
#define SERVICE_UUID "412cf883-c8b3-427f-807c-4ff39fda9c1a" // 自定义服务的 UUID
#define CHARACTERISTIC_UUID "ab6c95dd-82d4-4529-8b7e-d7d16ed93e5a" // 自定义特征的 UUID
void setup()
{
Serial.begin(115200);
Serial.println("开始初始化 BLE!");
// 初始化 BLE 设备,设置设备名称
BLEDevice::init("ESP32 BLE 测试");
// 创建 BLE 服务器
BLEServer *pServer = BLEDevice::createServer();
// 创建 BLE 服务,并指定 UUID
BLEService *pService = pServer->createService(SERVICE_UUID);
// 创建 BLE 特征(characteristic),支持读取和写入权限
BLECharacteristic *pCharacteristic = pService->createCharacteristic(
CHARACTERISTIC_UUID,
BLECharacteristic::PROPERTY_READ | BLECharacteristic::PROPERTY_WRITE);
// 设置特征值
pCharacteristic->setValue("IYATT-yx BLE Test");
// 启动服务
pService->start();
// 获取 BLE 广播对象
BLEAdvertising *pAdvertising = BLEDevice::getAdvertising();
// 添加服务 UUID 到广播包中
pAdvertising->addServiceUUID(SERVICE_UUID);
// 设置扫描响应为 true,可以让手机扫描时显示更多设备信息
pAdvertising->setScanResponse(true);
// 开始广播
BLEDevice::startAdvertising();
Serial.println("特征已定义!现在可以用手机读取它了!");
}
void loop()
{
delay(2000);
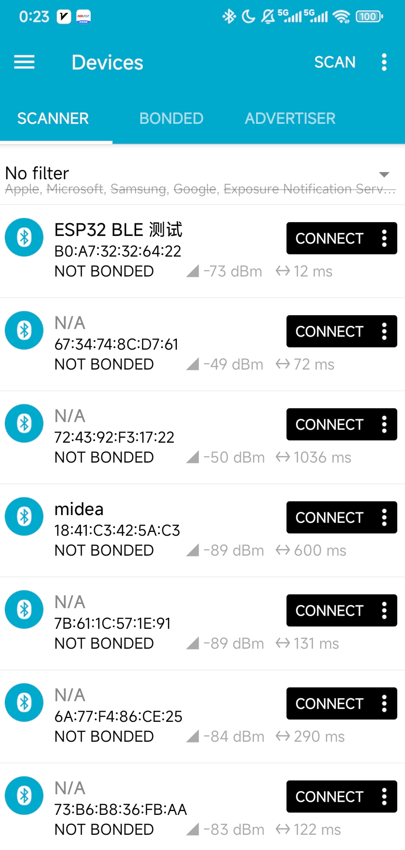
}上传后测试,nRF Connect 中可以搜到 ESP32 的蓝牙,点击 CONNECT 连接
可以看到有个 Unknown Service(未知服务),UUID 和上面代码设置的一致,点开可以看到有个 Unknown Characteristic(未知特征),UUID 和设置的也是一致的。点击下载图标,可以看到 Value(值)后的文本也是设置的 “IYATT-yx BLE Test”

交互
上面的代码设置了特征为可读写的,点击上传按钮
将发送值类型改为 TEXT (UTF-8),发送内容为 hello

然后可以看到读取的值也改为了 hello

遵循 Assigned Numbers 的 UUID
可以注意到上面的服务和特征都是未知,因为这是自定义的 UUID,可以使用这个网站生成:https://www.uuidgenerator.net/
同时蓝牙在 Assigned Numbers 中也定义了标准的 UUID,GATT Specification Supplement 中定义了特征值的数据格式。
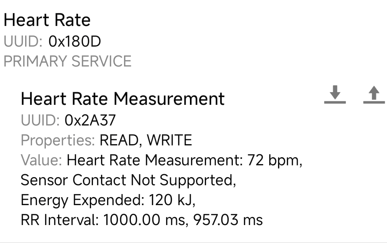
比如这里查阅 Assigned Numbers 可知心率服务为 0x180D

查 Assigned Numbers 可知心率测量特征为 0x2A37

分别设置进代码里

查 GATT Specification Supplement 可知心率测量的数据格式


代码里设置数据
    // 设置心率值

    // 设置标志
    // 位 0 = 0,使用 uint8 表示心率
    // 位 1 = 1,检测到传感器接触皮肤
    // 位 2 = 1,传感器支持接触检测,若值为 0,则位 1 数据无效
    // 位 3 = 1,包含能量消耗值
    // 位 4 = 1,包含 RR 间期值(相邻两次心跳的间隔)
    // 位 5-7 保留给未来使用,目前无意义
    uint8_t flags = 0b00011110;

    // 相关数据
    uint8_t heartRate8 = 72; // 心率值 72bpm
    uint16_t energyExpended = 120; // 能量消耗 120j
    uint16_t rrInterval[] = {1024, 980}; // 两个心跳间隔值,单位为 1/1024s(0.9765625ms)

    // 构建数据包
    std::string hrmData = "";
    hrmData += (char)flags;
    hrmData += (char)heartRate8;
    // 16位的数据要拆成2个8位数据,且按小端字节序存储
    hrmData += (char)(energyExpended & 0xff);
    hrmData += (char)((energyExpended >> 8) & 0xff);

    for (int i = 0; i < sizeof(rrInterval) / sizeof(rrInterval[0]); ++i)
    {
        hrmData += (char)(rrInterval[i] & 0xff);
        hrmData += (char)((rrInterval[i] >> 8) & 0xff);
    }

    // 设置特征值
    pCharacteristic->setValue(hrmData);
连接测试,可以看到现在不会显示未知服务/特征了,UUID 使用标准值,就可以识别为指定的服务/特征。且数据和代码里一致。其中“Contact is Detected”表示检测到接触

将 flags 里位 1 改为 0,可以看到时没有检测到了

把 flags 里位 2 改为 0,可以看到现在是不支持接触传感器