最近更新于 2024-05-05 14:19
本文主要是为了介绍使用 face_recognition(后简称 fr),该项目提供的 API 可以快速实现人脸识别的功能。
fr 本身是一个开源项目,地址位于:https://github.com/ageitgey/face_recognition,中译文档:https://github.com/ageitgey/face_recognition/blob/master/README_Simplified_Chinese.md
安装 fr 后,可以通过命令行使用,也可以通过编写 Python 程序使用接口。
测试环境
Ubuntu 20.04 x86_64
Python 3.9.10
face_recognition 1.3.0
pip3 install face_recognition==1.3.0
OpenCV 4.5.5
pip3 install opencv-python==4.5.5.64
命令行使用
检测人脸
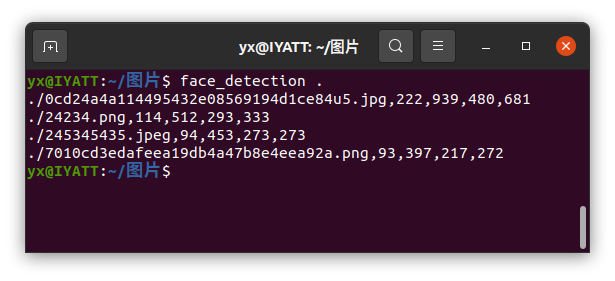
# 单张图片
face_detection [图片名]

# 多张图片
face_detection [图片所在路径]
我在网上下载的几张拜登的图片进行测试
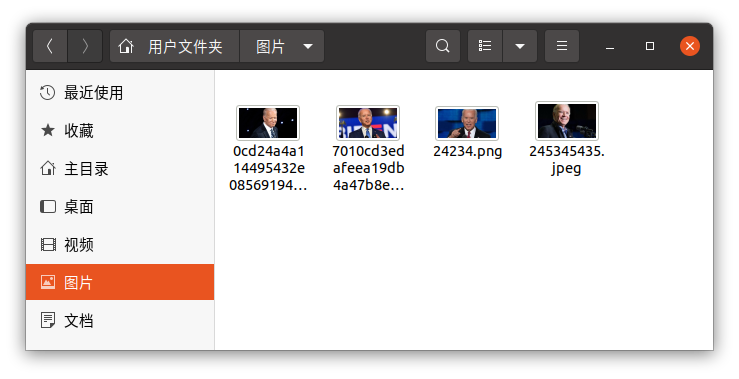
检测到人脸后会分别显示 上、右、下、左的坐标
识别人脸
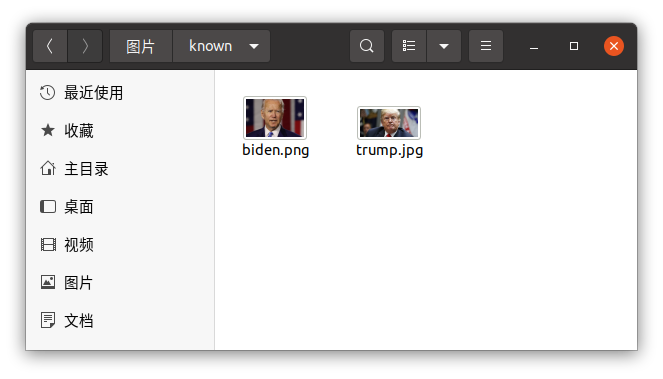
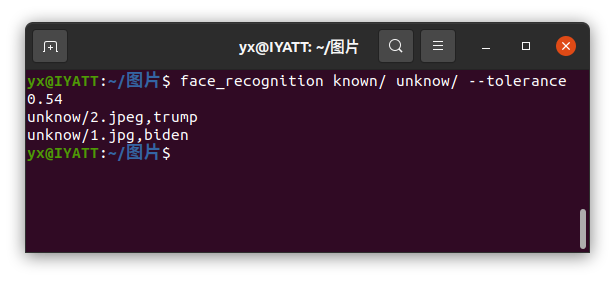
face_recognition [已知的人脸图片的文件夹] [待识别的人脸图片的文件夹]
我先创建两个文件夹 known 和 unknow,known 中存放已知的人脸,unknow 中存放待识别的人脸。

测试时发现出了问题,图片2明明只有川普,却有识别出拜登
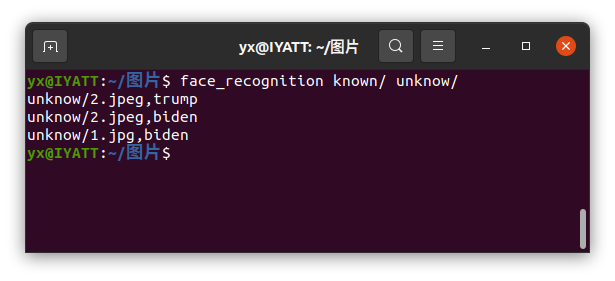
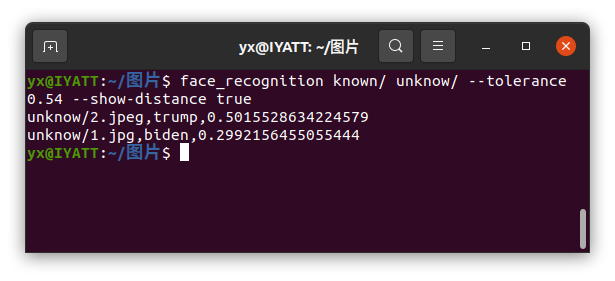
那么此时可以调节容错率,默认容错率是 0.6,那么这里设置为 0.54 试试
--tolerance=0.54
这次识别就没问题了
如果要查看识别的人脸匹配程度,可以加上参数
--show-distance true
数值越小匹配度越高
当图片量比较大时,也可以支持并行,通过参数指定并行数量
--cpus
如果传 -1 则对应所有 CPU 核心
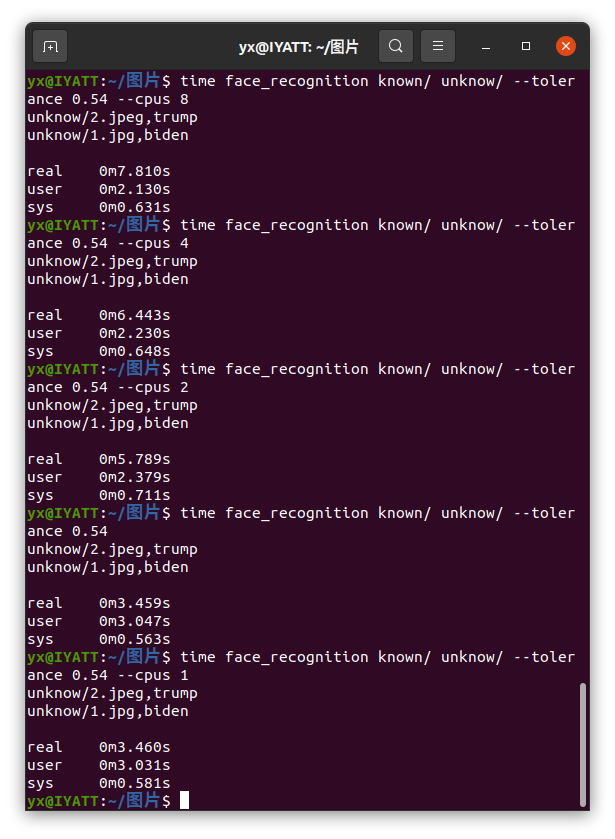
我这里测试出现了意外,居然并行数越多越慢,我猜测可能是图片数量比较少,就两张,本来很简单的工作,强行拆分到几个核心去,时间就耗在了分配上。
Python 开发
检测人脸
素材图片
from PIL import Image
import face_recognition
# 导入图片,需要自己指定图片
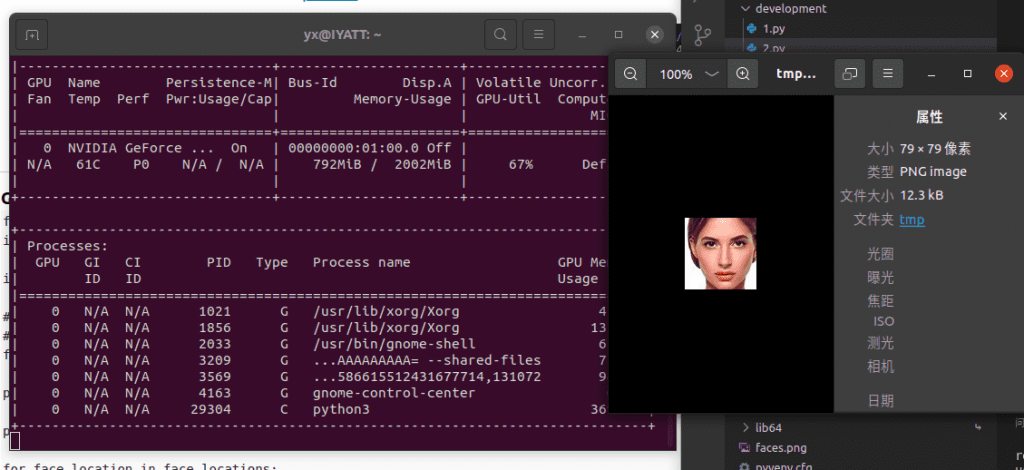
image = face_recognition.load_image_file("faces.png")
# 寻找图片中所有的人脸
# 基于 HOG-based 模型
# 该模型的准确度很高,不过相对 CNN 低,也没有 GPU 加速
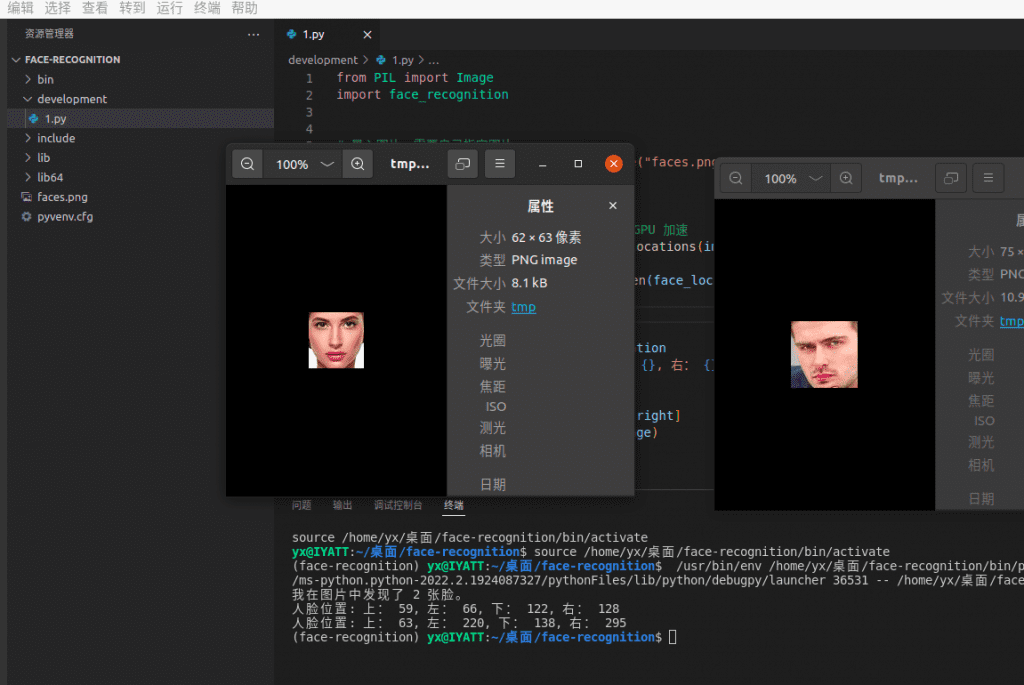
face_locations = face_recognition.face_locations(image)
print("我在图片中发现了 {} 张脸。".format(len(face_locations)))
for face_location in face_locations:
# 显示每张人脸的位置信息
top, right, bottom, left = face_location
print("人脸位置: 上: {}, 左: {}, 下: {}, 右: {}".format(top, left, bottom, right))
# 单独截取人脸出来截取
face_image = image[top:bottom, left:right]
pil_image = Image.fromarray(face_image)
pil_image.show()
上面的人脸检测是基于 HOG-based 模型,如果需要更高的准确度,可以使用 CNN。
但是相应的速度会很慢,有 GPU 加速支持的话会好一些。face_recognition 的底层依赖的是 Dlib 库,如果需要 GPU 加速支持,那么需要先配置 CUDA,然后再编译安装 Dlib,参阅:https://blog.iyatt.com/?p=1237
这里我是用的自己的笔记本电脑测试,有 NVIDIA 的独显。如果是用树梅派,那就没法用 GPU 加速了,NVIDIA 的 Jetson 开发板有 GPU,目前还没测试,等 fr 整体介绍写完后,我再看看。
from PIL import Image
import face_recognition

image = face_recognition.load_image_file("faces.png")

# CNN 模型
# number_of_times_to_upsample 多次采样次数,值越大,可以发现更小的人脸
face_locations = face_recognition.face_locations(image, number_of_times_to_upsample=0, model="cnn")

print("I found {} face(s) in this photograph.".format(len(face_locations)))

print("我在图片中发现了 {} 张脸。".format(len(face_locations)))

for face_location in face_locations:
    # 显示每张人脸的位置信息
    top, right, bottom, left = face_location
    print("人脸位置: 上: {}, 左: {}, 下: {}, 右: {}".format(top, left, bottom, right))

    # 单独截取人脸出来截取
    face_image = image[top:bottom, left:right]
    pil_image = Image.fromarray(face_image)
    pil_image.show()
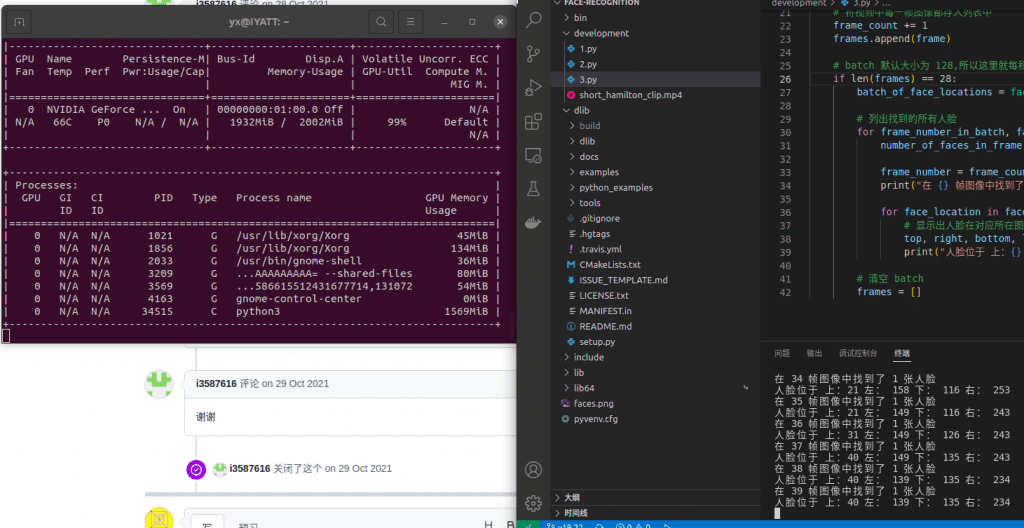
当运行这个程序进行检测人脸,可以在左边(nvidia-smi -l 命令持续查看 GPU 资源使用信息)看到 GPU 使用率瞬间上升到 67%,并多出了一个 Python3 进程,代表 GPU 参与了加速计算。
有了 GPU 加速,检测速率会提高很多。前面是单张图像的,现在引入多张图像,使用一段小视频演示。
import face_recognition
import cv2


# 读视频
video_capture = cv2.VideoCapture("short_hamilton_clip.mp4")

frames = []
frame_count = 0

while video_capture.isOpened():
    # 从视频中获取一帧图像
    ret, frame = video_capture.read()
    # 视频结尾退出循环
    if not ret:
        break

    # 将图像从 OpenCV 的 BGR 转为 RGB
    frame = frame[:, :, ::-1]

    # 将视频中每一帧图像都存入列表中
    frame_count += 1
    frames.append(frame)

    # batch 默认大小为 128,如果显存足够大,可以改为 128
    # 我笔记本电脑独显就 2GB,同时处理的图像数再大一点就会超过显存容量,运行出错
    if len(frames) == 28:
        batch_of_face_locations = face_recognition.batch_face_locations(frames, number_of_times_to_upsample=0)

        # 列出找到的所有人脸
        for frame_number_in_batch, face_locations in enumerate(batch_of_face_locations):
            number_of_faces_in_frame = len(face_locations)

            frame_number = frame_count - 128 + frame_number_in_batch
            print("在 {} 帧图像中找到了 {} 张人脸".format(frame_number, number_of_faces_in_frame))

            for face_location in face_locations:
                # 显示出人脸在对应所在图片中的位置
                top, right, bottom, left = face_location
                print("人脸位于 上:{} 左: {} 下: {} 右: {}".format(top, left, bottom, right))

        # 清空 batch
        frames = []
人脸关键点提取
素材图片
from PIL import Image, ImageDraw
import face_recognition
# 导入图片
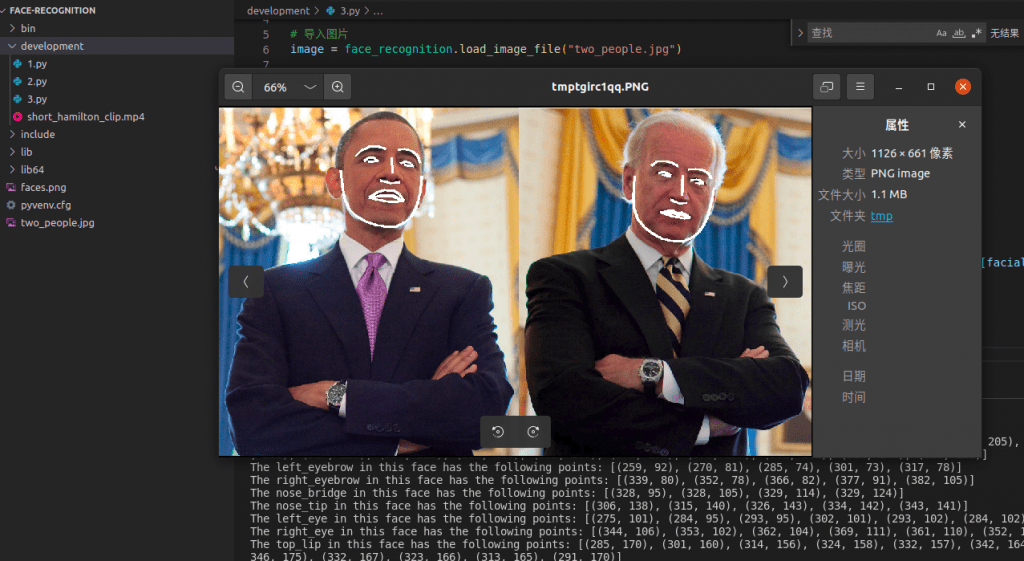
image = face_recognition.load_image_file("two_people.jpg")
# 寻找图像中所有人脸的面部特征
face_landmarks_list = face_recognition.face_landmarks(image)
print("在图像中找到 {} 张人脸".format(len(face_landmarks_list)))
# 创建一个 PIL 绘图对象,以便在图像中绘画
pil_image = Image.fromarray(image)
d = ImageDraw.Draw(pil_image)
for face_landmarks in face_landmarks_list:
# 显示人脸面部特征在图像中的位置
for facial_feature in face_landmarks.keys():
print("特征 {} 位于 {}".format(facial_feature, face_landmarks[facial_feature]))
# 用线条勾勒出面部特征
for facial_feature in face_landmarks.keys():
d.line(face_landmarks[facial_feature], width=5)
# 显示图片
pil_image.show()
人脸识别
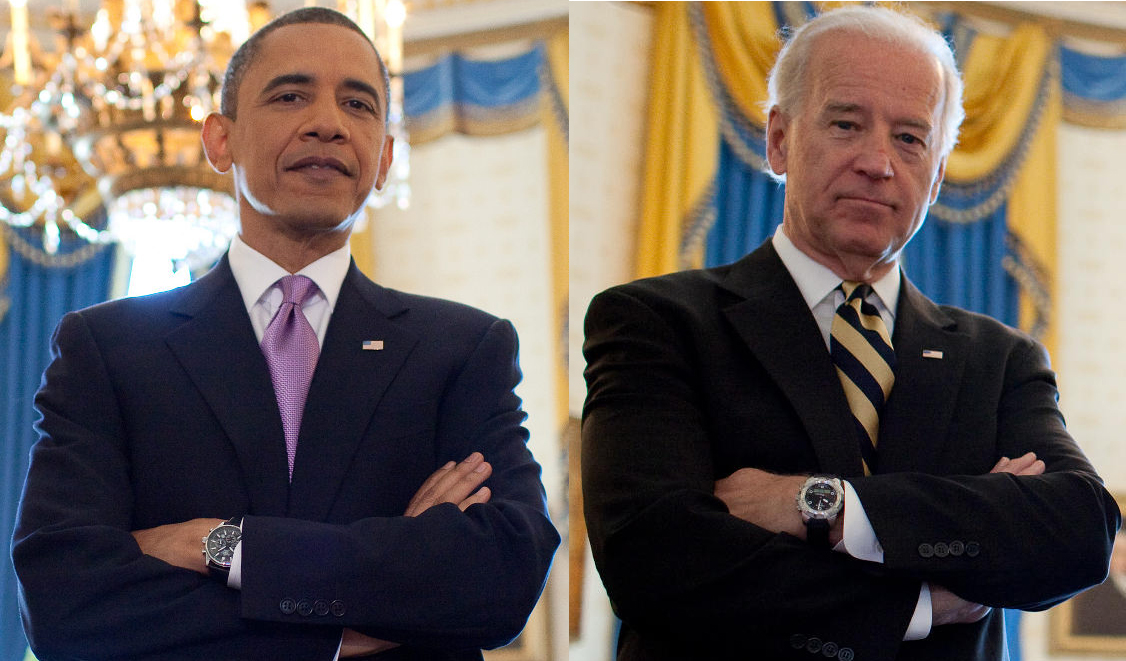
图像素材
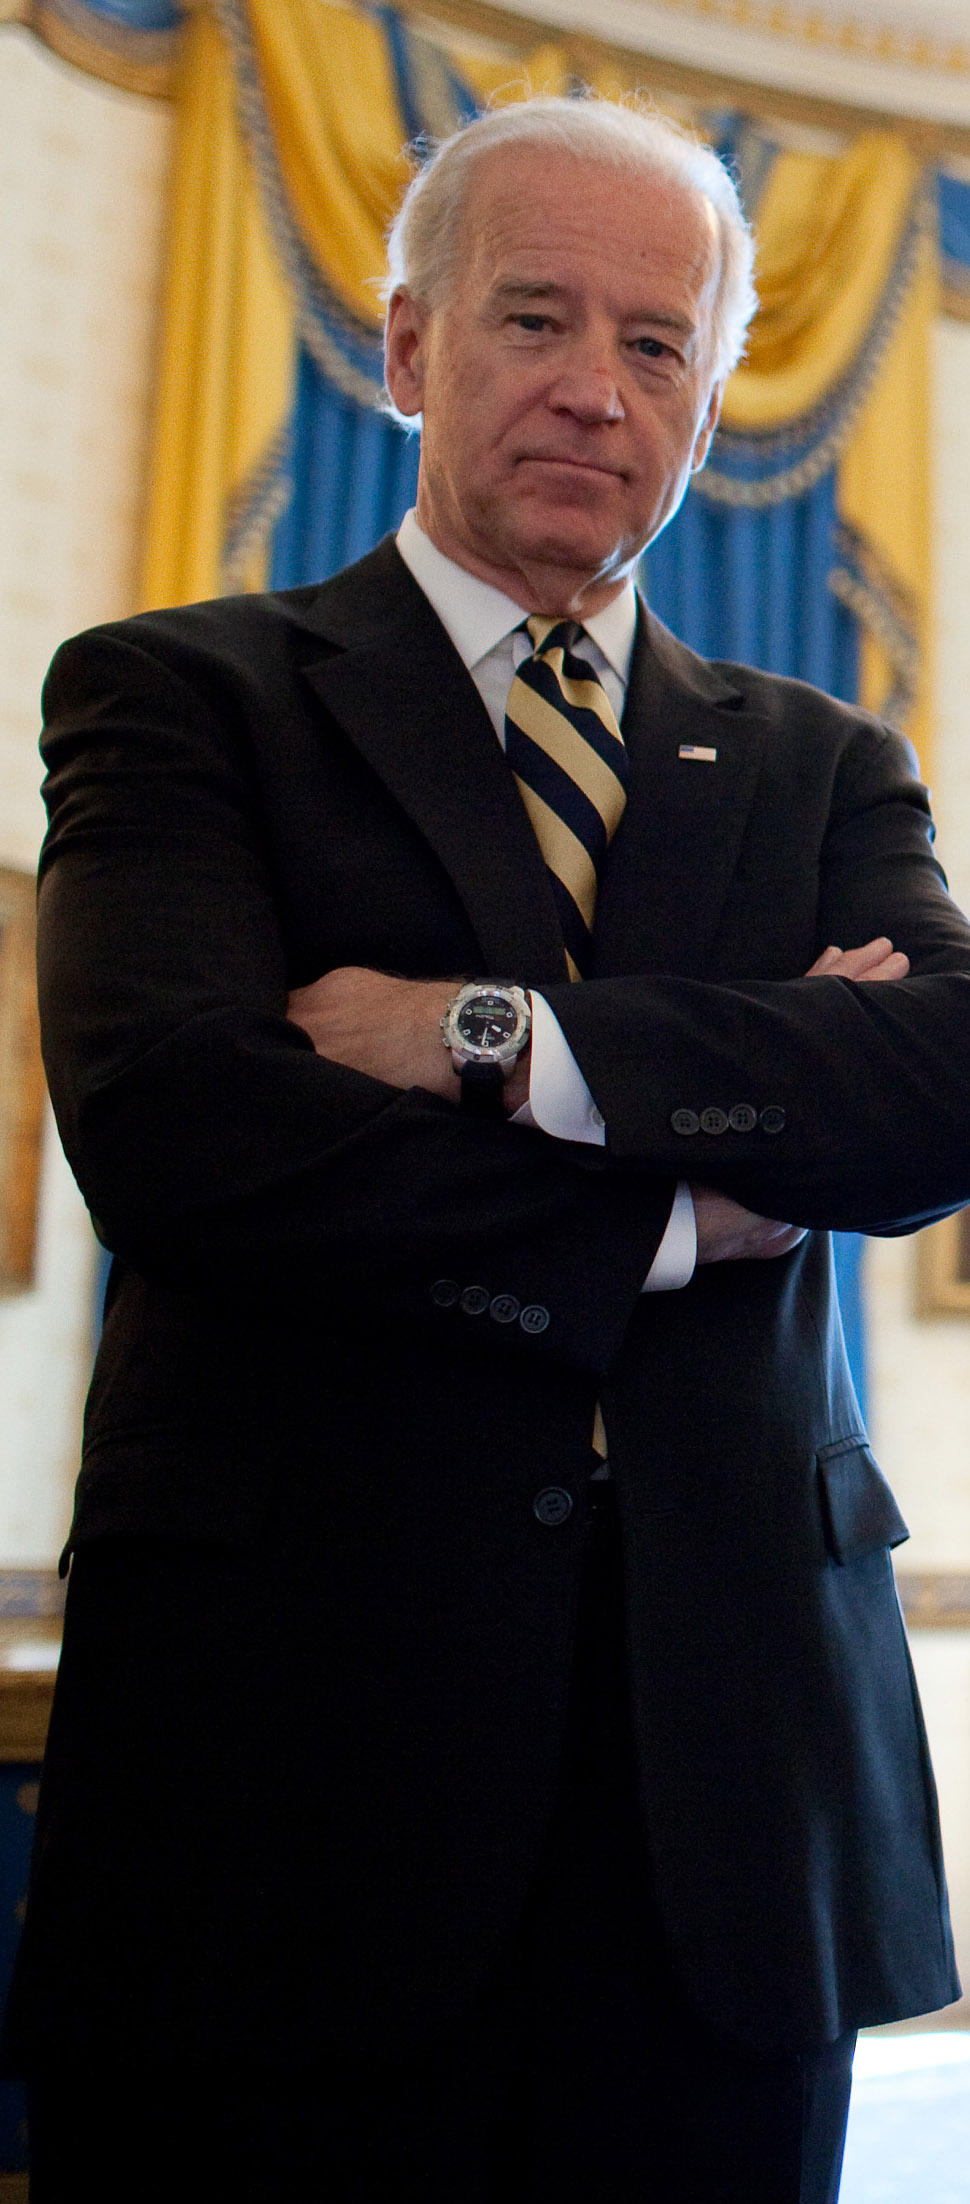
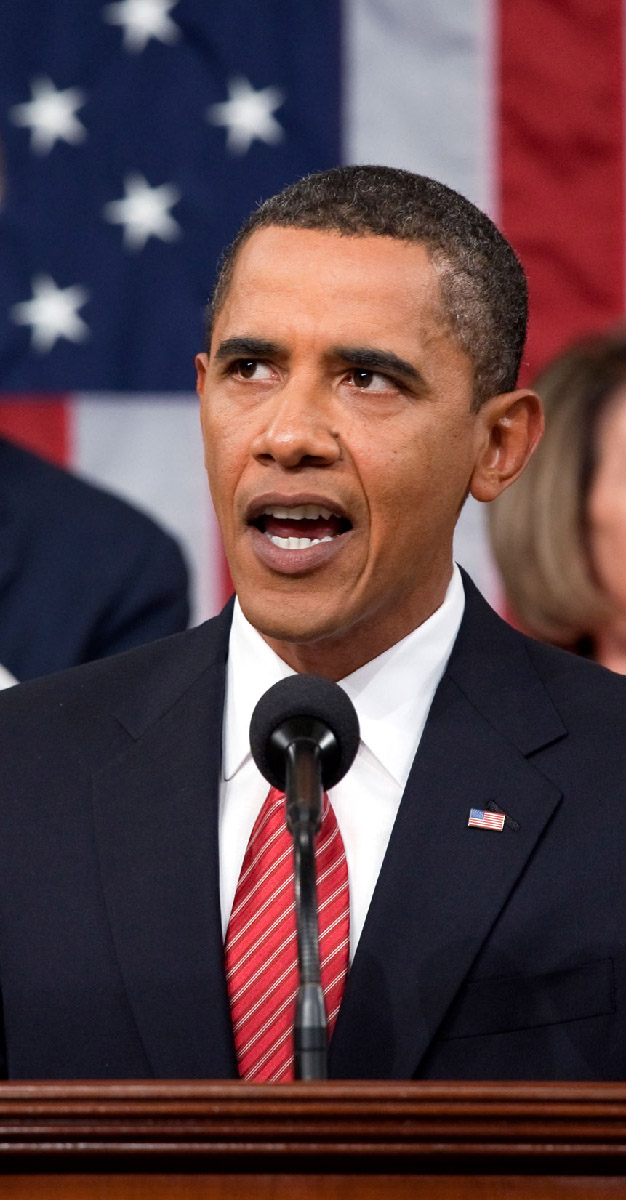
import face_recognition
# 导入图像
biden_image = face_recognition.load_image_file("biden.jpg")
obama_image = face_recognition.load_image_file("obama.jpg")
unknown_image = face_recognition.load_image_file("obama2.jpg")
# Get the face encodings for each face in each image file
# Since there could be more than one face in each image, it returns a list of encodings.
# But since I know each image only has one face, I only care about the first encoding in each image, so I grab index 0.
# 检测图像中人脸
# 一张图像可能含有多张人脸,返回结果是一个列表
# 但是根据这里准备的素材,我自己是知道一张图片只有一张人脸,所以检测到的人脸肯定位于下标 0 的位置
try:
biden_face_encoding = face_recognition.face_encodings(biden_image)[0]
obama_face_encoding = face_recognition.face_encodings(obama_image)[0]
unknown_face_encoding = face_recognition.face_encodings(unknown_image)[0]
except IndexError:
print("我在其中一张图像中未发现任何人脸,请准备含有人脸的图片文件!")
quit()
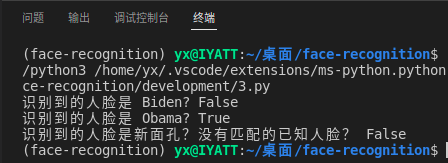
# 已知的人脸
known_faces = [biden_face_encoding, obama_face_encoding]
# 结果返回 True 或 False,告诉我们待识别的人脸是否有匹配的已知人脸
results = face_recognition.compare_faces(known_faces, unknown_face_encoding)
print("识别到的人脸是 Biden? {}".format(results[0]))
print("识别到的人脸是 Obama? {}".format(results[1]))
print("识别到的人脸是新面孔?没有匹配的已知人脸? {}".format(not True in results))
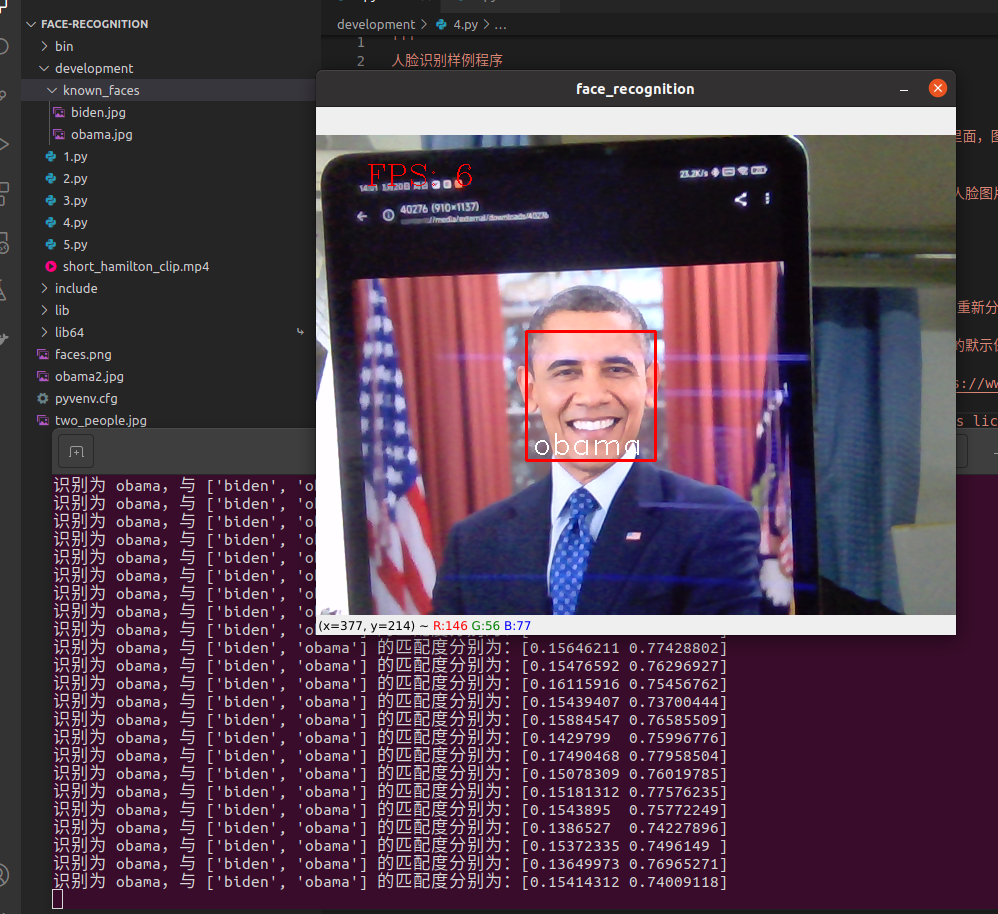
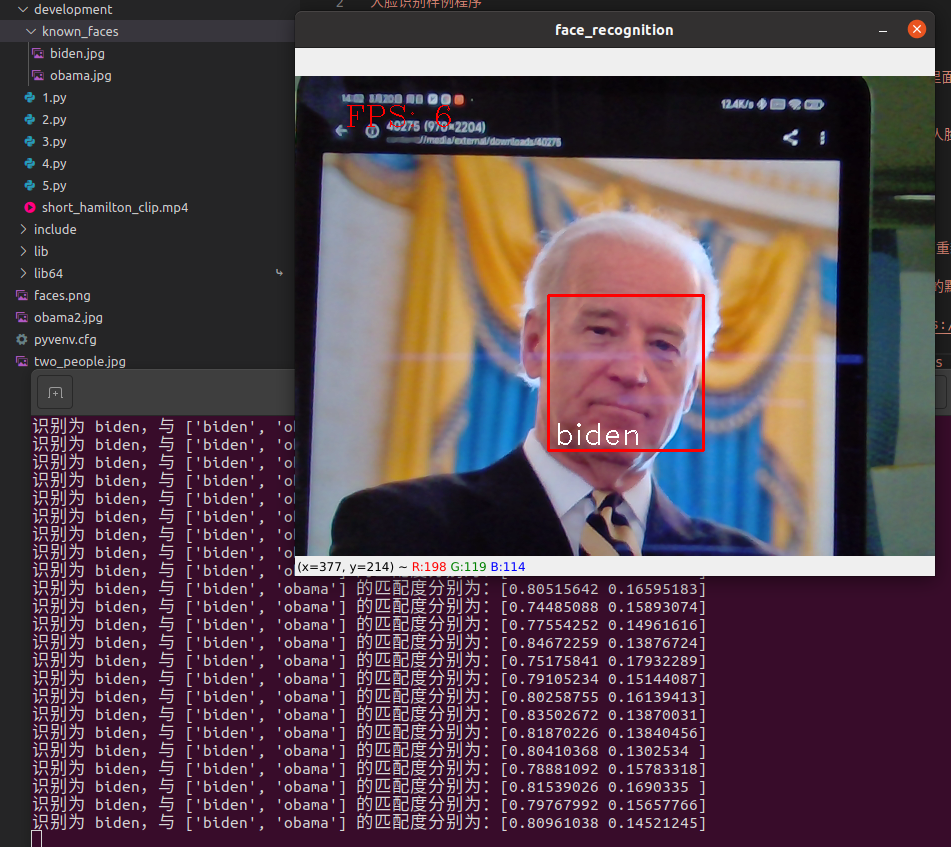
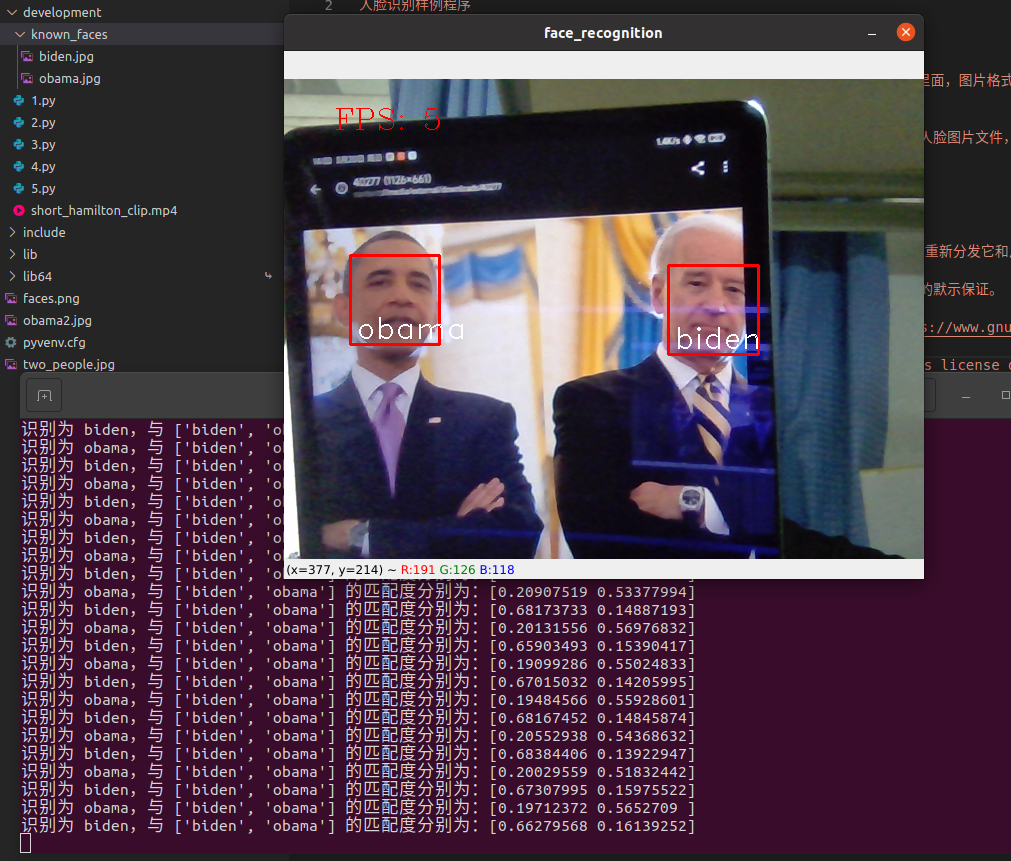
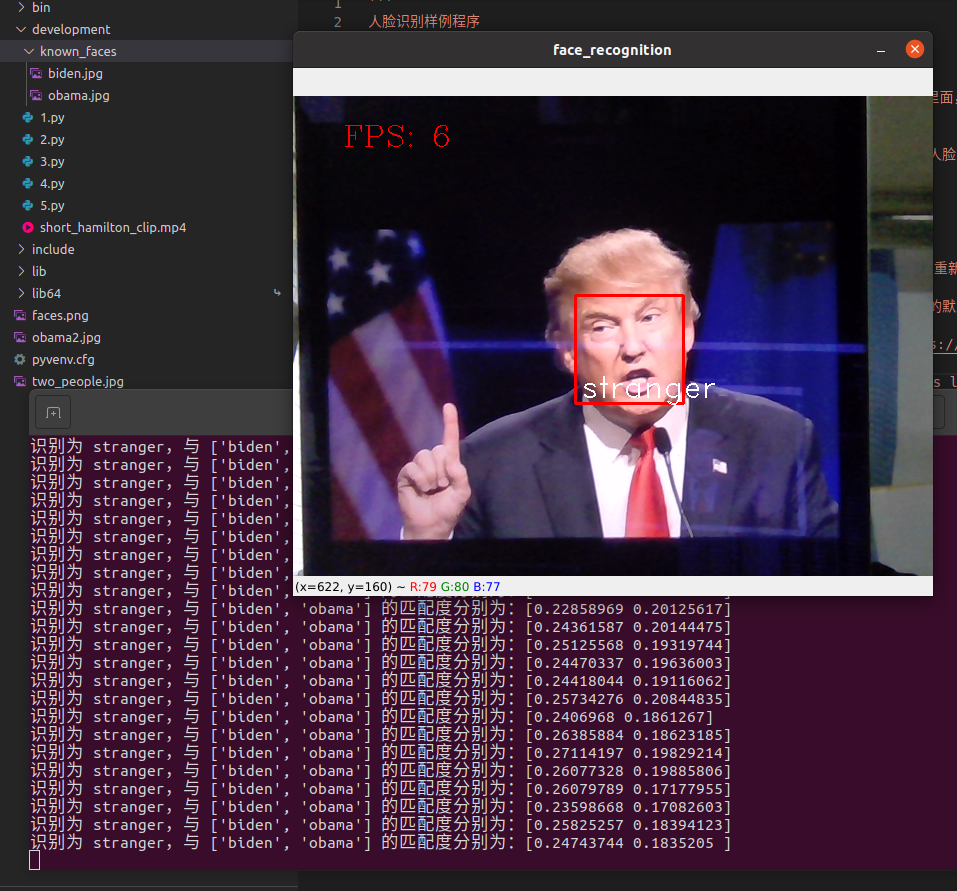
人脸识别完整样例程序,支持实时预览
'''
人脸识别样例程序
视频源可以来自于摄像头、视频文件、视频源链接
实时预览识别情况,对识别出的人脸进行标注

使用时需要在代码所在目录下创建一个文件夹名为 known_faces ,将已知人脸图片放在里面,图片格式要求为 .jpg,不能在该文件夹下放置其它文件
如果识别时在已知人脸中有匹配的图像,那么会用已知人脸图片名对识别到的人脸进行标注

该样例程序单纯完整地示例一遍人脸识别的实现,并未写异常处理,如果未按要求放置已知人脸图片文件,可能会出现意想不到的错误。


Copyright (C) 2022 IYATT-yx iyatt@iyatt.com
Everyone is permitted to copy and distribute verbatim copies of this license document, but changing it is not allowed.
This program is free software: you can redistribute it and/or modify
it under the terms of the GNU Affero General Public License as published
by the Free Software Foundation, either version 3 of the License, or
(at your option) any later version.
This program is distributed in the hope that it will be useful,
but WITHOUT ANY WARRANTY; without even the implied warranty of
MERCHANTABILITY or FITNESS FOR A PARTICULAR PURPOSE.  See the
GNU Affero General Public License for more details.
You should have received a copy of the GNU Affero General Public License
along with this program.  If not, see <https://www.gnu.org/licenses/>.
'''

import os
import cv2
from cv2 import batchDistance
import numpy as np
from face_recognition import *


class Face_recognition(object):
    def __init__(self, cap):
        # 已知人脸的路径
        known_face_folder = os.sep.join([os.path.abspath(os.path.dirname(__file__)), 'known_faces'])
        # 已知人脸图片的文件名
        self.known_face_names = [known_face_name.strip('.jpg') for known_face_name in os.listdir(known_face_folder)]
        # 已知人脸图片的绝对路径
        known_face_paths = [os.sep.join([known_face_folder, known_face_name + '.jpg']) for known_face_name in self.known_face_names]
        # 导入已知人脸的图片
        known_face_imgs = [load_image_file(known_face_name) for known_face_name in known_face_paths]
        # 提取人脸并编码
        self.known_face_encodings = [face_encodings(known_face_img, face_locations(known_face_img))[0] for known_face_img in known_face_imgs]
        # 打开视频流
        self.cap = cv2.VideoCapture(cap)
        # 保存上次的计数,用于 FPS 计算
        self.last = 0

    def add_fps(self, img, x, y, r, g, b):
        now = cv2.getTickCount()
        fps = int(cv2.getTickFrequency() / (now - self.last))
        cv2.putText(img, 'FPS: {}'.format(fps), (x,y), cv2.FONT_HERSHEY_COMPLEX, 1, (b,g,r))
        self.last = now

    def run(self):
        while True:
            ret, bgr_img = self.cap.read()
            # 视频播放完就退出
            if not ret:
                break
            # BGR 转 RGB
            rgb_img = bgr_img[:, :, ::-1]
            # 在图像上添加 FPS
            self.add_fps(bgr_img, 50, 50, 255, 0, 0)
            # 检测人脸
            locations = face_locations(rgb_img)
            # 没有检测到人脸继续下一帧
            if not locations:
                cv2.imshow('face_recognition', bgr_img)
                if cv2.waitKey(1) == 27:
                    break
                continue
            # 对检测到的人脸编码
            unknow_face_encodings = face_encodings(rgb_img, locations)

            # 将待检测的人脸数据与已知人脸数据进行对比
            face_names = []
            for unknow_face_encoding in unknow_face_encodings:
                matches = compare_faces(self.known_face_encodings, unknow_face_encoding)
                name = 'stranger'
                distance = face_distance(self.known_face_encodings, unknow_face_encoding)
                best_match_idx = np.argmin(distance)
                if matches[best_match_idx]:
                    name = self.known_face_names[best_match_idx]
                print('识别为 {},与 {} 的匹配度分别为:{}'.format(name, self.known_face_names, 1 - distance))
                face_names.append(name)

            # 根据检测到的人来内位置在图像上框画出来,并标注识别结果
            for (top, right, bottom, left), name in zip(locations, face_names):
                cv2.rectangle(bgr_img, (left, top), (right, bottom), (0, 0, 255), 2)
                cv2.putText(bgr_img, name, (left + 6, bottom - 6), cv2.FONT_HERSHEY_DUPLEX, 1.0, (255, 255, 255), 1)

            # 预览图像
            cv2.imshow('face_recognition', bgr_img)
            if cv2.waitKey(1) == 27:  # 按 Esc 退出
                break

    def __del__(self):
        self.cap.release()  # 析构释放视频采集对象


if __name__ == '__main__':
    fr = Face_recognition(0)  # 指定数字就对应系统摄像头编号,另外也可以指定视频路径或者视频源的链接
    fr.run()  # 运行识别程序
运行效果