最近更新于 2024-05-05 14:19
测试环境
Ubuntu 20.04 x86_64
Windows 11 专业工作站版 21H2
————————————————
Python 3.9.10
Matplotlib
NumPy
OpenCV 4.5.5
pip3 install opencv-python==4.5.5.62
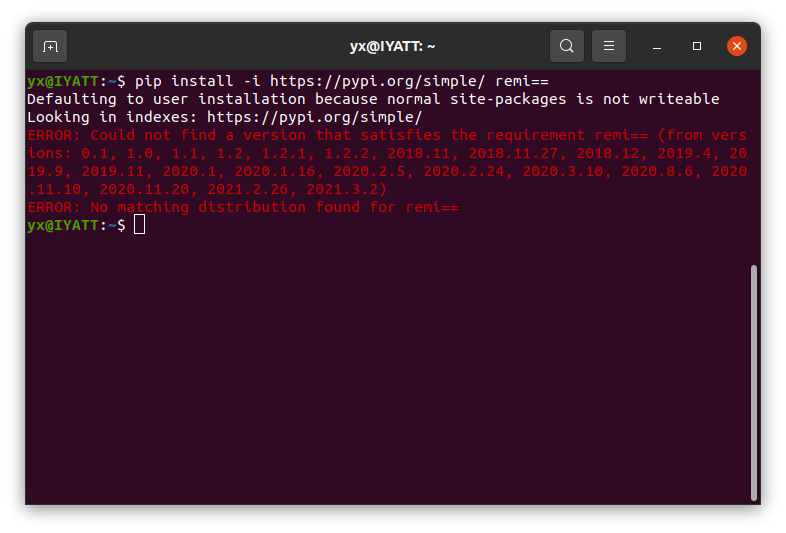
pip3 install -i https://pypi.org/simple/ remi==2021.3.2
(见后面第一个案例程序)如果调用 start() 方法时,指定了参数 standalone=True,那么运行的程序将不再依赖于浏览器打开网页,而是直接创建一个应用程序界面。并且指定该参数后,就不得再指定监听地址、端口、缓存……,debug 和 title 可以使用。
并且需要安装下面的依赖库才能使用 standalone=True。
pywebview
注意下面三个版本要统一
pyqt5
pyqt5-tools
pyqtwebengine
后面开始就是示例:
官方案例代码:https://github.com/dddomodossola/remi/tree/master/examples
这个项目的文档只有引入的程度,要学习还是得阅读案例代码。
后面的示例代码有部分就是直接在案例代码的基础上做修改的,另外部分是根据自己的想法写的。原项目的开源协议为 Apache 2.0,要求在修改过的文件中保留原声明(版权、专利、许可证……)以及说明改了哪。
对于示例代码的修改,主要是在用中文重写代码中英文字段、注释以及添加了一些更详细的中文注释,另外可能部分细节功能调整,功能性修改在代码注释中说明。
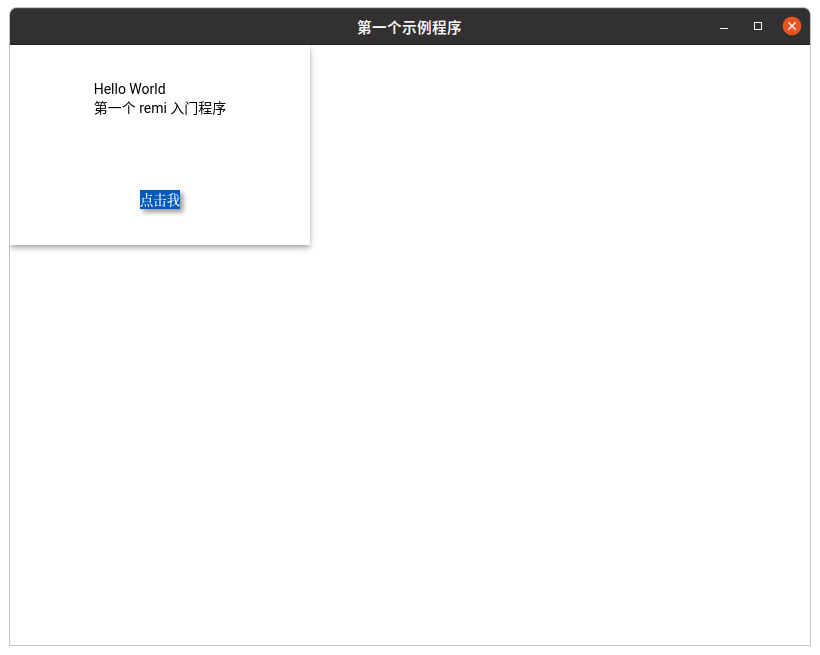
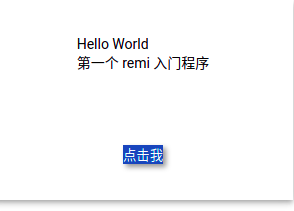
入门程序 – Hello Wolrd
"""
Licensed under the Apache License, Version 2.0 (the "License");
you may not use this file except in compliance with the License.
You may obtain a copy of the License at
http://www.apache.org/licenses/LICENSE-2.0
Unless required by applicable law or agreed to in writing, software
distributed under the License is distributed on an "AS IS" BASIS,
WITHOUT WARRANTIES OR CONDITIONS OF ANY KIND, either express or implied.
See the License for the specific language governing permissions and
limitations under the License.
"""
""" 入门体验程序 - Hello World
"""
from remi import start, App, gui
class MyApp(App):
# def __init__(self, *args):
# super(MyApp, self).__init__(*args)
def main(self):
wid = gui.VBox(width=300, height=200) # 创建一个垂直布局的顶层容器
self.lbl = gui.Label('Hello World\n第一个 remi 入门程序', style={"white-space":"pre"}) # 创建一个标签
bt = gui.Button('点击我') # 创建一个按钮
bt.onclick.do(self.call_button) # 监听点击事件
# 将标签和按钮两个部件添加到顶层容器中
wid.append(self.lbl)
wid.append(bt)
# 返回根容器对象
return wid
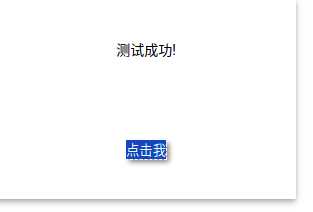
def call_button(self, emitter):
self.lbl.set_text('测试成功!')
if __name__ == "__main__":
start(MyApp,
address='0.0.0.0', # 监听地址。监听 127.0.0.1 时只有本机可以访问;监听 0.0.0.0 时,本机和外部访问(局域网或者公网)。不设置该参数则默认只监听本机。
port=9999, # 监听端口。设置 0 就是应用随机选择一个可用的端口,1024 以下端口需要 root 运行,往上至 65535 是普通用户可以使用的。不设置该参数则默认随机。
# 每个客户端都访问一个独立的对象,以 cookie 区分
# 当设置为 True 时,多个浏览器访问,每个浏览器访问的对象都是独立的,互不影响
# 当设置为 False 时,多个浏览器访问同一个对象,某个浏览器对页面进行了操作,其它浏览器看到的页面也同步变化
multiple_instance=True,
enable_file_cache=False, # 启用资源缓存
update_interval=0, # 如果定义了 App.idle 方法,那么执行的间隔时间由该参数指定,单位为秒。设置为 0 时,idle 方法不会被调用。
start_browser=True, # 是否在启动程序时自动打开本机的浏览器访问页面
debug=True, # 打印调试信息
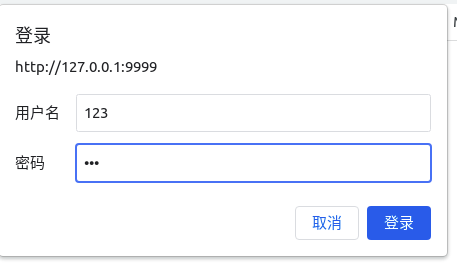
username='123', # 用户名 - 打开页面是时登录才可以访问,不设置就不写 username 和 password 或者传参 None,用户名和密码需要同时存在,否则无效。
password='123', # 用户密码
title='第一个示例程序' # 网页标题
)
增减控件
"""
Licensed under the Apache License, Version 2.0 (the "License");
you may not use this file except in compliance with the License.
You may obtain a copy of the License at
http://www.apache.org/licenses/LICENSE-2.0
Unless required by applicable law or agreed to in writing, software
distributed under the License is distributed on an "AS IS" BASIS,
WITHOUT WARRANTIES OR CONDITIONS OF ANY KIND, either express or implied.
See the License for the specific language governing permissions and
limitations under the License.
"""
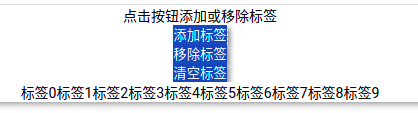
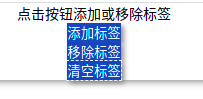
""" 这个范例主要演示下面控件的用法:
Widget.append(widget, key): 添加小部件到容器部件中
Widget.remove_child(widget): 从容器部件中移除小部件
Widget.empty(): 清空容器部件中的所有小部件
"""
from remi import start, App, gui
class MyApp(App):
def call_add_label(self, emitter):
""" 添加标签
"""
key = str(len(self.lbls_container.children))
lbl = gui.Label('标签' + key + ' ')
self.lbls_container.append(lbl, key)
def call_remove_label(self, emitter):
""" 移除标签
"""
if len(self.lbls_container.children) < 1:
return
key = str(len(self.lbls_container.children) - 1)
self.lbls_container.remove_child(self.lbls_container.children[key])
def call_empty_label(self, emitter):
""" 清空标签
"""
self.lbls_container.empty()
def main(self):
main_container = gui.VBox() # 创建垂直方向分布的容器 - 顶级容器
lbl = gui.Label('点击按钮添加或移除标签')
bt_add = gui.Button('添加标签')
bt_add.onclick.do(self.call_add_label)
bt_remove = gui.Button('移除标签')
bt_remove.onclick.do(self.call_remove_label)
bt_empty = gui.Button('清空标签')
bt_empty.onclick.do(self.call_empty_label)
self.lbls_container = gui.HBox() # 创建水平分布的容器 - 用于盛放添加的标签
main_container.append([lbl, bt_add, bt_remove, bt_empty, self.lbls_container])
return main_container
if __name__ == '__main__':
start(MyApp, port=9999, start_browser=True)
用户界面操作关闭服务器
"""
   Licensed under the Apache License, Version 2.0 (the "License");
   you may not use this file except in compliance with the License.
   You may obtain a copy of the License at

       http://www.apache.org/licenses/LICENSE-2.0

   Unless required by applicable law or agreed to in writing, software
   distributed under the License is distributed on an "AS IS" BASIS,
   WITHOUT WARRANTIES OR CONDITIONS OF ANY KIND, either express or implied.
   See the License for the specific language governing permissions and
   limitations under the License.
"""

""" 为用户提供一个停止服务器运行的开关
    用户点击停止按钮,会终止服务器运行
"""

from remi import start, App, gui


class MyApp(App):
    def main(self):
        wid = gui.VBox(width=300, height=200, margin='0px auto')

        bt = gui.Button('关闭应用', width=200, height=30)
        bt.style['margin'] = 'auto 50px'  # 边宽
        bt.style['background-color'] = 'red'  # 背景色

        bt.onclick.do(self.call_close_app)

        wid.append(bt)
        return wid

    def call_close_app(self, _):
        """ 执行关闭服务器操作
        """
        self.close()

    def on_close(self):
        """ 关闭服务器端前执行
            类似于析构函数,释放对象前进行善后工作
        """
        super(MyApp, self).on_close()


if __name__ == "__main__":
    start(MyApp, port=9999)
通知消息
"""
Licensed under the Apache License, Version 2.0 (the "License");
you may not use this file except in compliance with the License.
You may obtain a copy of the License at
http://www.apache.org/licenses/LICENSE-2.0
Unless required by applicable law or agreed to in writing, software
distributed under the License is distributed on an "AS IS" BASIS,
WITHOUT WARRANTIES OR CONDITIONS OF ANY KIND, either express or implied.
See the License for the specific language governing permissions and
limitations under the License.
"""
"""
通知消息
"""
from remi import start, App, gui
class MyApp(App):
def main(self):
wid = gui.VBox(width=300, height=200, margin='0px auto')
self.lbl = gui.Label('请点击按钮', width='80%', height='50%')
self.lbl.style['margin'] = 'auto'
self.bt = gui.Button('按钮', width=200, height=30)
self.bt.style['margin'] = 'auto 50px'
self.bt.onclick.do(self.call_button_pressed)
wid.append(self.lbl)
wid.append(self.bt)
return wid
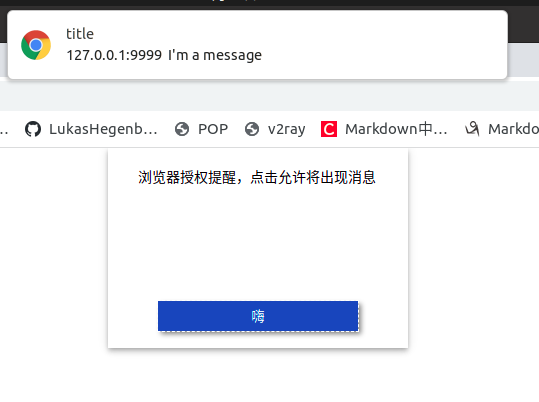
def call_button_pressed(self, widget):
self.lbl.set_text('浏览器授权提醒,点击允许将出现消息')
self.bt.set_text('嗨')
self.notification_message('title', 'I\'m a message') # 似乎通知内容和消息内容不支持中文
if __name__ == "__main__":
start(MyApp, debug=True, port=9999)
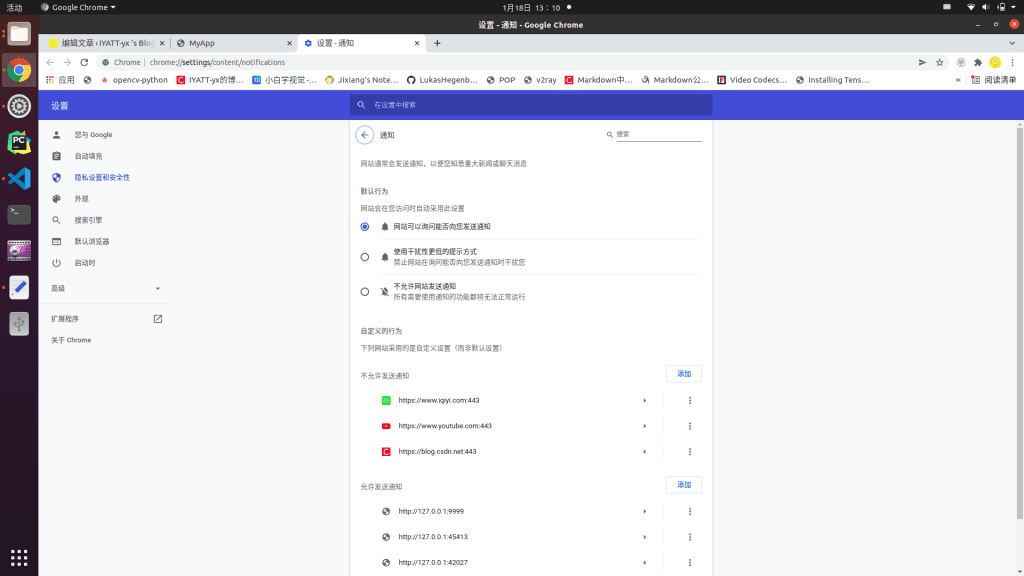
谷歌浏览器通知设置
选择输入部件
"""
Licensed under the Apache License, Version 2.0 (the "License");
you may not use this file except in compliance with the License.
You may obtain a copy of the License at
http://www.apache.org/licenses/LICENSE-2.0
Unless required by applicable law or agreed to in writing, software
distributed under the License is distributed on an "AS IS" BASIS,
WITHOUT WARRANTIES OR CONDITIONS OF ANY KIND, either express or implied.
See the License for the specific language governing permissions and
limitations under the License.
"""
"""
选择输入
"""
import remi.gui as gui
from remi import start, App
import os
class MyApp(App):
def main(self):
main_container = gui.VBox(width=300, height=200, style={'margin': '0px auto'})
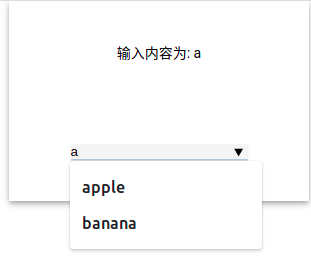
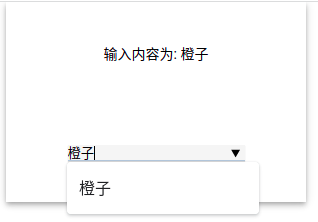
label = gui.Label("选择一种水果")
# 第一个参数:当输入的内容存在于这个参数列表中时,会作为预测结果显示
# 第二个参数:默认值
# 第三个参数:输入类型(文本)
selection_input = gui.SelectionInputWidget(['apple', 'banana', '橙子', '草莓', '榴莲'], 'apple', 'text')
selection_input.oninput.do(lambda emitter, value: label.set_text("输入内容为: %s" %value))
main_container.append([label, selection_input])
return main_container
if __name__ == "__main__":
start(MyApp, port=9999)
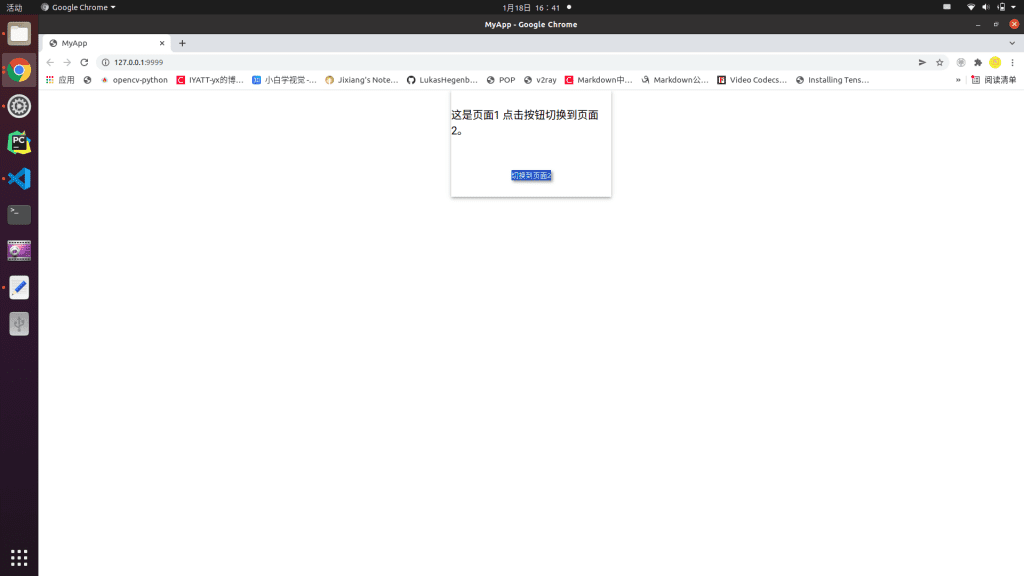
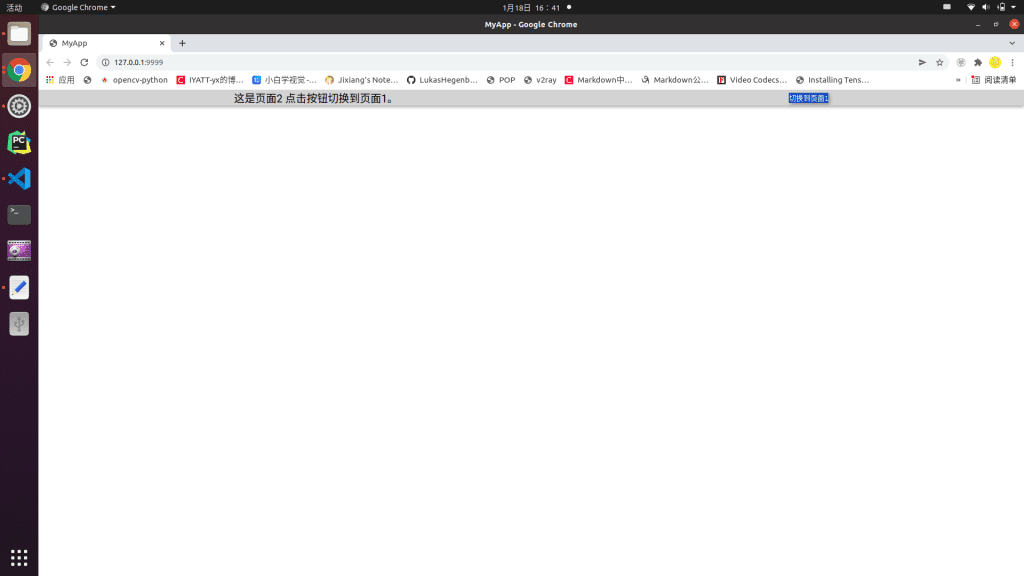
切换根容器
"""
   Licensed under the Apache License, Version 2.0 (the "License");
   you may not use this file except in compliance with the License.
   You may obtain a copy of the License at

       http://www.apache.org/licenses/LICENSE-2.0

   Unless required by applicable law or agreed to in writing, software
   distributed under the License is distributed on an "AS IS" BASIS,
   WITHOUT WARRANTIES OR CONDITIONS OF ANY KIND, either express or implied.
   See the License for the specific language governing permissions and
   limitations under the License.
"""

"""
    修改顶层容器
"""

from remi import start, App, gui
import os


class MyApp(App):
    def main(self):
        lbl = gui.Label("这是页面2 点击按钮切换到页面1。", style={'font-size': '20px'})
        bt2 = gui.Button("切换到页面1")
        page2 = gui.HBox(children=[lbl, bt2], style={'margin': '0px auto', 'background-color': 'lightgray'})

        lbl = gui.Label("这是页面1 点击按钮切换到页面2。", style={'font-size': '20px'})
        bt1 = gui.Button("切换到页面2")
        page1 = gui.VBox(children=[lbl, bt1],
                         style={'width': '300px', 'height': '200px', 'margin': '0px auto', 'background-color': 'white'})

        bt1.onclick.do(self.call_change_root, page2)
        bt2.onclick.do(self.call_change_root, page1)

        return page1

    def call_change_root(self, emitter, page_to_be_shown):
        self.set_root_widget(page_to_be_shown)


if __name__ == "__main__":
    start(MyApp, port=9999, start_browser=True)
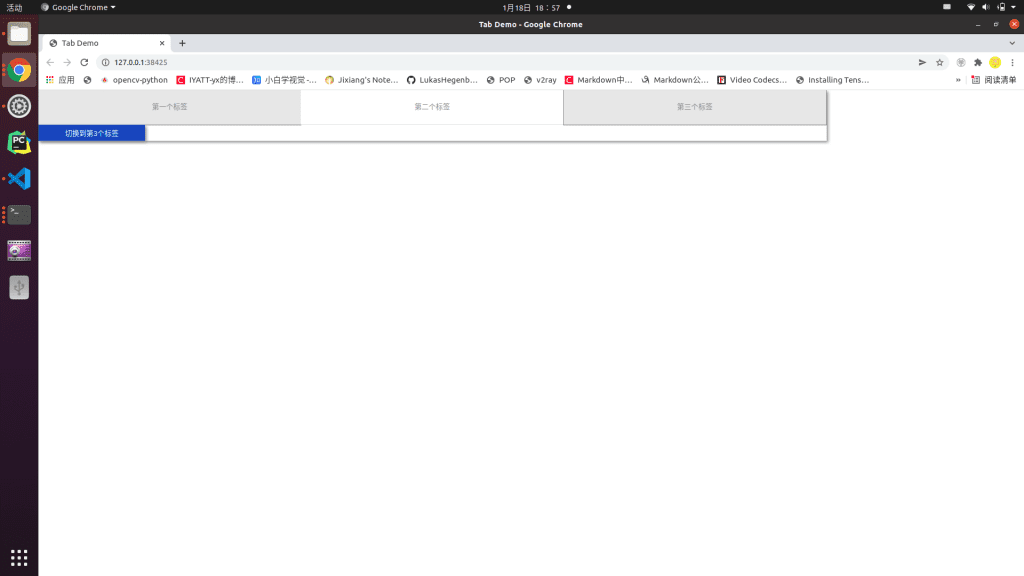
多页面容器
"""
   Licensed under the Apache License, Version 2.0 (the "License");
   you may not use this file except in compliance with the License.
   You may obtain a copy of the License at

       http://www.apache.org/licenses/LICENSE-2.0

   Unless required by applicable law or agreed to in writing, software
   distributed under the License is distributed on an "AS IS" BASIS,
   WITHOUT WARRANTIES OR CONDITIONS OF ANY KIND, either express or implied.
   See the License for the specific language governing permissions and
   limitations under the License.
"""

"""
    多页面容器
"""

from remi import start, App, gui


class MyApp(App):
    def call_bt1_pressed(self, widget, tabbox, refWidgetTab):
        tabbox.select_by_widget(refWidgetTab)  # 通过标签对象选择

    def call_bt2_pressed(self, widget, tabbox, refWidgetTabName):
        tabbox.select_by_name(refWidgetTabName)  # 通过标签名字选择

    def call_bt3_pressed(self, widget, tabbox, tabIndex):
        tabbox.select_by_index(tabIndex)  # 通过标签序号选择

    def main(self):
        tb = gui.TabBox(width='80%')

        b1 = gui.Button('切换到第2个标签', width=200, height=30)
        tb.append(b1, '第一个标签')

        b2 = gui.Button('切换到第3个标签', width=200, height=30)
        tb.add_tab(b2, '第二个标签', None)

        b3 = gui.Button('切换到第1个标签', width=200, height=30)
        tb.add_tab(b3, '第三个标签', None)

        b1.onclick.do(self.on_bt1_pressed, tb, b2)
        b2.onclick.do(self.on_bt2_pressed, tb, '第三个标签')
        b3.onclick.do(self.on_bt3_pressed, tb, 0)

        return tb


if __name__ == "__main__":
    start(MyApp, title="Tab Demo", standalone=False)
基于 js 检测页面关闭或刷新
"""
Licensed under the Apache License, Version 2.0 (the "License");
you may not use this file except in compliance with the License.
You may obtain a copy of the License at
http://www.apache.org/licenses/LICENSE-2.0
Unless required by applicable law or agreed to in writing, software
distributed under the License is distributed on an "AS IS" BASIS,
WITHOUT WARRANTIES OR CONDITIONS OF ANY KIND, either express or implied.
See the License for the specific language governing permissions and
limitations under the License.
"""
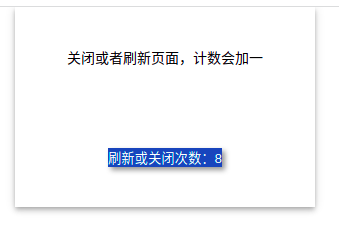
"""
基于 js 检测页面关闭
原案例代码是:关闭页面或者刷新页面将会关闭客户端程序。
这里我改为了一个计数显示,每次操作会加一。
原代码见末尾
"""
from remi import start, App, gui
counter = 0
class MyApp(App):
def main(self, name='world'):
wid = gui.VBox(width=300, height=200, margin='0px auto')
lbl = gui.Label("关闭或者刷新页面,计数会加一")
wid.append(lbl)
self.bt = gui.Button('刷新或关闭次数:0') # 用于显示计数
wid.append(self.bt)
# 本人没学过 js,下面调用 js 代码是沿用的示例程序,我也不懂具体原理
tag = gui.Tag(_type='script')
tag.add_child("javascript", """window.onunload=function(e){remi.sendCallback('%s','%s');return "close?";};""" % (
str(id(self)), "call_add"))
wid.add_child("onunloadevent", tag)
return wid
def call_add(self):
global counter
counter = counter + 1
self.bt.set_text('刷新或关闭次数:{}'.format(counter))
if __name__ == "__main__":
start(MyApp)
#原代码内容
#import remi.gui as gui
#from remi import start, App
#class MyApp(App):
# def main(self, name='world'):
# # margin 0px auto allows to center the app to the screen
# wid = gui.VBox(width=300, height=200, margin='0px auto')
# lbl = gui.Label("Close or reload the page, the console thread will stop automatically.")
# wid.append(lbl)
# # add the following 3 lines to your app and the on_window_close method to make the console close automatically
# tag = gui.Tag(_type='script')
# tag.add_child("javascript", """window.onunload=function(e){remi.sendCallback('%s','%s');return "close?";};""" % (
# str(id(self)), "on_window_close"))
# wid.add_child("onunloadevent", tag)
# # returning the root widget
# return wid
# def on_window_close(self):
# # here you can handle the unload
# print("app closing")
# self.close()
#if __name__ == "__main__":
# start(MyApp)
#
网格布局
"""
Licensed under the Apache License, Version 2.0 (the "License");
you may not use this file except in compliance with the License.
You may obtain a copy of the License at
http://www.apache.org/licenses/LICENSE-2.0
Unless required by applicable law or agreed to in writing, software
distributed under the License is distributed on an "AS IS" BASIS,
WITHOUT WARRANTIES OR CONDITIONS OF ANY KIND, either express or implied.
See the License for the specific language governing permissions and
limitations under the License.
"""
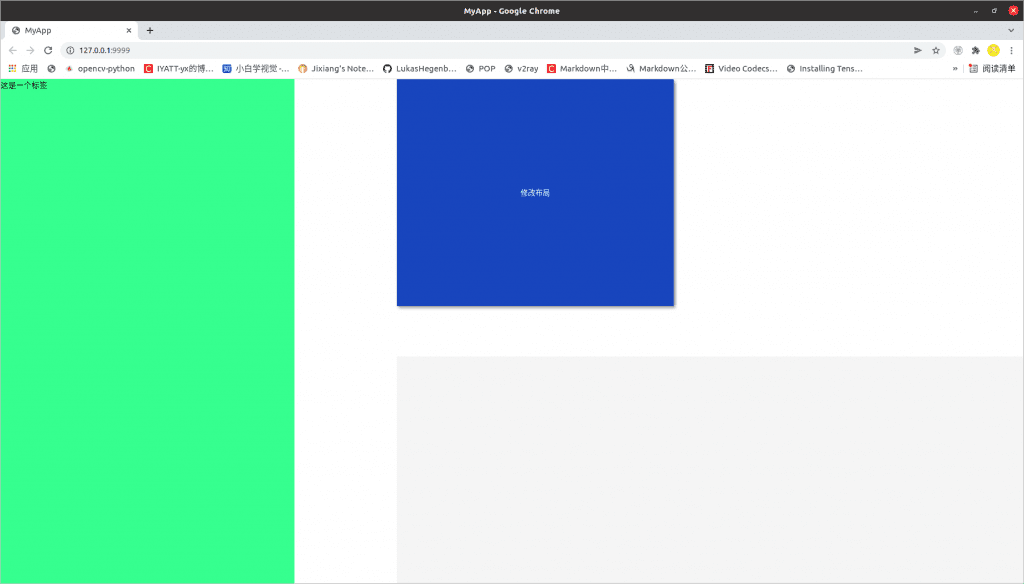
""" 网格布局开发示例
向网格布局容器中添加部件对象时采用的格式是字典,key 映射到 value 所代表的部件对象,
设置布局时在一个矩阵中指定位置放置 key,绘制用户界面时则是映射的这个矩阵,
部件的位置对应 key 在这个矩阵中的位置。
"""
from remi import start, App, gui
class MyApp(App):
def main(self):
main_container = gui.GridBox(width='100%', height='100%', style={'margin':'0px auto'}) # 创建网格布局容器
label = gui.Label('这是一个标签')
label.style['background-color'] = 'lightgreen'
button = gui.Button('修改布局', height='100%')
button.onclick.do(self.call_redefine_grid, main_container) # 后一个参数是传给回调函数的
text = gui.TextInput()
""" | 用于列分隔,行之间空格分开
后面两个参数分别为:column_gap 和 row_gap,
代表部件之间的列间距和行间距(百分比例)
"""
main_container.set_from_asciiart("""
|label|button|.|
|label|text|text|
""", 10, 10)
main_container.append({'label':label, 'button':button, 'text':text}) # 将部件添加到容器中
return main_container
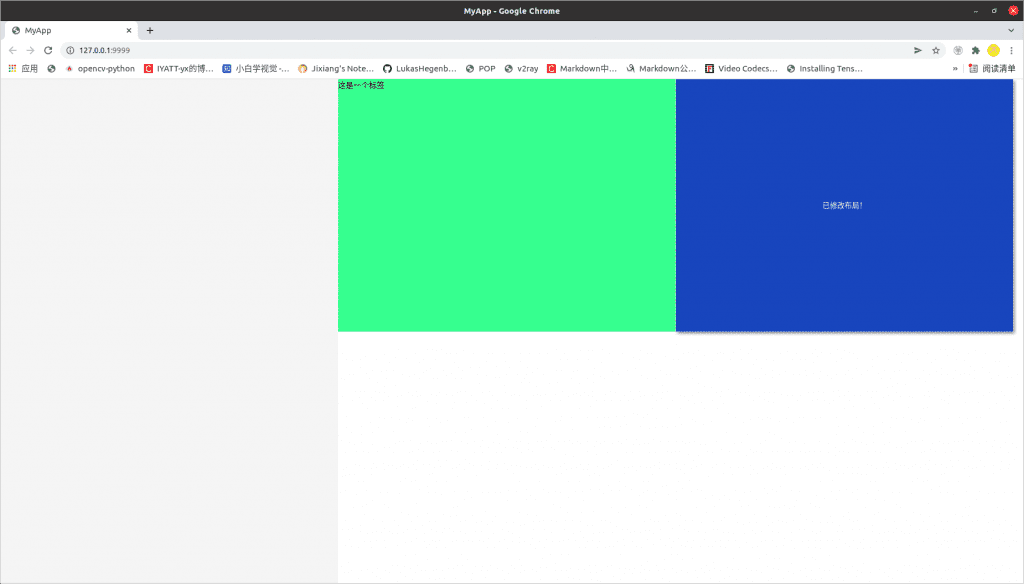
def call_redefine_grid(self, emitter, container):
""" 重定义布局
emmiter 指向调用本函数的对象 - 这里为 button
container 为调用本函数传入的参数 - 这里是 main——container
"""
# 和上面的布局设置形式不同,这个布局是一个二维的列表
container.define_grid([
['text','label','button'],
['text','.','.']
])
container.style.update({'grid-template-columns':'33% 33% 33%', 'grid-template-rows':'50% 50%'}) # 行列尺寸的比例 - 这列 3 列 2 行平均分布的
container.set_column_gap("0%") # 部件列间距
container.set_row_gap("0%") # 部件行间距
emitter.set_text("已修改布局!")
if __name__ == "__main__":
start(MyApp, port=9999, debug=True)
水平布局和垂直布局
"""
Licensed under the Apache License, Version 2.0 (the "License");
you may not use this file except in compliance with the License.
You may obtain a copy of the License at
http://www.apache.org/licenses/LICENSE-2.0
Unless required by applicable law or agreed to in writing, software
distributed under the License is distributed on an "AS IS" BASIS,
WITHOUT WARRANTIES OR CONDITIONS OF ANY KIND, either express or implied.
See the License for the specific language governing permissions and
limitations under the License.
"""
""" 水平布局和垂直布局的使用
"""
from cgitb import enable
import remi.gui as gui
from remi.gui import *
from remi import start, App
class MyApp(App):
def main(self):
mainContainer = Container(width=706, height=445, margin='0px auto', style="position: relative") # 创建顶层容器
subContainer = HBox(width=630, height=277, style='position: absolute; left: 40px; top: 150px; background-color: #b6b6b6') # 水平布局容器 - 二级容器
mainContainer.append(subContainer,'subContainer')
vbox = VBox(width=300, height=250) # 垂直布局容器 - 三级容器
bt1 = Button('bt1', width=100, height=30)
vbox.append(bt1,'bt1')
bt3 = Button('bt3', width=100, height=30)
vbox.append(bt3,'bt3')
bt2 = Button('bt2', width=100, height=30)
vbox.append(bt2,'bt2')
subContainer.append(vbox,'vbox')
hbox = HBox(width=300, height=250) # 水平布局容器 - 三级容器
lbl1 = Label('lbl1', width=50, height=50, style='background-color: #ffb509')
hbox.append(lbl1,'lbl1')
lbl2 = Label('lbl2', width=50, height=50, style='background-color: #40ff2b')
hbox.append(lbl2,'lbl2')
lbl3 = Label('lbl3', width=50, height=50, style='background-color: #e706ff')
hbox.append(lbl3,'lbl3')
subContainer.append(hbox,'hbox')
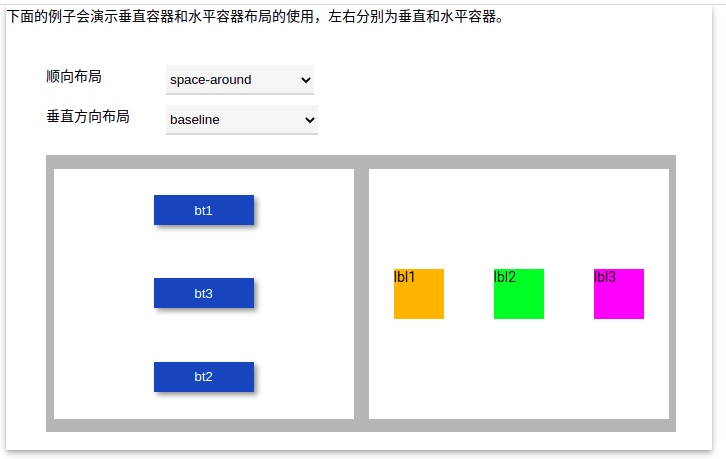
# 下拉菜单1 - 设置容器顺方向布局
comboJustifyContent = gui.DropDown.new_from_list(('flex-start','flex-end','center','space-between','space-around'),
style='left: 160px; position: absolute; top: 60px; width: 148px; height: 30px')
mainContainer.append(comboJustifyContent,'comboJustifyContent')
lblJustifyContent = Label('顺向布局', style='left: 40px; position: absolute; top: 60px; width: 100px; height: 30px')
mainContainer.append(lblJustifyContent,'lblJustifyContent')
# 下拉菜单2 - 设置容器垂直方向布局
comboAlignItems = gui.DropDown.new_from_list(('stretch','center','flex-start','flex-end','baseline'),
style='left:160px; position:absolute; top:100px; width:152px; height: 30px')
mainContainer.append(comboAlignItems,'comboAlignItems')
lblAlignItems = Label('垂直方向布局', style='left:40px; position:absolute; top:100px; width:100px; height:30px')
mainContainer.append(lblAlignItems,'lblAlignItems')
# 注册下拉菜单点击选择事件
mainContainer.children['comboJustifyContent'].onchange.do(self.call_change_JustifyContent,vbox,hbox)
mainContainer.children['comboAlignItems'].onchange.do(self.call_change_AlignItems,vbox,hbox)
lblTitle = gui.Label("下面的例子会演示垂直容器和水平容器布局的使用,左右分别为垂直和水平容器。",
style='position:absolute; left:0px; top:0px')
mainContainer.append(lblTitle)
return mainContainer
def call_change_JustifyContent(self,emitter,new_value,vbox,hbox):
""" 修改容器顺向布局
比如垂直容器顺向就是垂直方向(上->下)
水平容器顺向就是水平方向(左->右)
第三个参数的值为下拉菜单选中的选项值
"""
vbox.style['justify-content'] = new_value
hbox.style['justify-content'] = new_value
def call_change_AlignItems(self,emitter,new_value,vbox,hbox):
""" 修改容器垂直方向布局
"""
vbox.style['align-items'] = new_value
hbox.style['align-items'] = new_value
if __name__ == "__main__":
start(MyApp, address='0.0.0.0', port=9999, multiple_instance=False, enable_file_cache=True, update_interval=0.1, start_browser=True, debug=True)
idle 方法的使用
"""
Licensed under the Apache License, Version 2.0 (the "License");
you may not use this file except in compliance with the License.
You may obtain a copy of the License at
http://www.apache.org/licenses/LICENSE-2.0
Unless required by applicable law or agreed to in writing, software
distributed under the License is distributed on an "AS IS" BASIS,
WITHOUT WARRANTIES OR CONDITIONS OF ANY KIND, either express or implied.
See the License for the specific language governing permissions and
limitations under the License.
"""
""" idle 方法的使用
该方法由 remi 库自动循环执行,可指定间隔时间
"""
import remi.gui as gui
from remi import start, App
import threading
class MyApp(App):
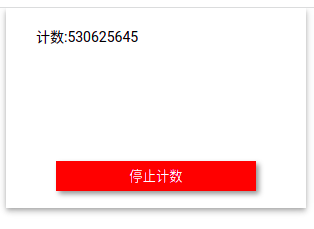
def idle(self):
""" 定义了该方法名会被自动循环调用
间隔时间由 start(update_interval=) 指定,单位为秒,设置为 0 ,则不会调用本方法
"""
self.lbl.set_text('计数:' + str(self.counter))
def main(self):
wid = gui.VBox(width=300, height=200, margin='0px auto')
self.lbl = gui.Label('计数:', width='80%', height='50%')
self.lbl.style['margin'] = 'auto'
bt = gui.Button('停止计数', width=200, height=30)
bt.style['margin'] = 'auto 50px'
bt.style['background-color'] = 'red'
wid.append(self.lbl)
wid.append(bt)
self.thread_alive_flag = True
self.counter = 0
# 创建一个线程执行计数
t = threading.Thread(target=self.my_intensive_long_time_algorithm)
t.start()
bt.onclick.do(self.on_button_pressed)
return wid
def my_intensive_long_time_algorithm(self):
while self.thread_alive_flag:
self.counter = self.counter + 1
def on_button_pressed(self, emitter):
self.thread_alive_flag = False
if __name__ == "__main__":
start(MyApp, debug=True, port=9999, update_interval=0.1)
像创建线程一样创建服务
"""
   Licensed under the Apache License, Version 2.0 (the "License");
   you may not use this file except in compliance with the License.
   You may obtain a copy of the License at

       http://www.apache.org/licenses/LICENSE-2.0

   Unless required by applicable law or agreed to in writing, software
   distributed under the License is distributed on an "AS IS" BASIS,
   WITHOUT WARRANTIES OR CONDITIONS OF ANY KIND, either express or implied.
   See the License for the specific language governing permissions and
   limitations under the License.
"""

"""
    这个案例演示像线程一样启动应用,
    启动应用后,不会阻塞主线程,主线程能继续独立的执行其它任务。
"""

from remi import App, Server, gui
import time


# 用于储存 App 实例对象
global_app_instance = None

class MyApp(App):
    label = None

    def main(self):
        global global_app_instance
        global_app_instance = self

        main_container = gui.VBox(width=300, height=200, style={'margin': '0px auto'})
        self.label = gui.Label("标签")

        main_container.append(self.label)

        return main_container


if __name__ == "__main__":
    # 创建一个 start=False 的服务,再手动运行
    server = Server(MyApp, start=False, port=9999, start_browser=False, multiple_instance=False)
    server.start()  # 启动服务

    index = 0
    # 主线程执行循环
    while True:
        if not global_app_instance is None:  # 确认 App 实例已经创建
            with global_app_instance.update_lock:  # 线程同步
                global_app_instance.label.set_text("%s" %index)
                index = index + 1
        time.sleep(1)
API 接口
"""
   Licensed under the Apache License, Version 2.0 (the "License");
   you may not use this file except in compliance with the License.
   You may obtain a copy of the License at

       http://www.apache.org/licenses/LICENSE-2.0

   Unless required by applicable law or agreed to in writing, software
   distributed under the License is distributed on an "AS IS" BASIS,
   WITHOUT WARRANTIES OR CONDITIONS OF ANY KIND, either express or implied.
   See the License for the specific language governing permissions and
   limitations under the License.
"""

"""
    创建 API 接口
"""

from remi import start, App, gui


class RemoteLabel(gui.Label):
    def api_set_label(self, value1, value2):
        """
            方法名对应 API 链接 http://127.0.0.1:9999/label/api_set_label?
            参数 value1 和 value2 对应链接 value1= & value2= 传入的值
        """
        self.set_text('value1: %s - value2: %s' % (value1, value2))
        headers = {'Content-type': 'text/plain'}
        return ['OK', headers]


class MyApp(App):
    def main(self):
        wid = gui.VBox()

        # {'id': 'label'} 对应到 API 链接中 http://127.0.0.1:9999/label
        self.lbl = RemoteLabel(
            '请另外新建一个网页标签打开链接请求访问 API(传入请求为 value1 和 value2 的值): http://127.0.0.1:9999/label/api_set_label?value1=text1&value2=text2',
            width='80%', height='50%', attributes={'id': 'label'})
        self.lbl.style['margin'] = 'auto'

        wid.append(self.lbl)

        return wid


if __name__ == "__main__":
    start(MyApp, debug=True, port=9999)
摄像头预览
官方的案例中有提供一个摄像头预览的程序,我看了一下,主要功能都是调用 js 实现的,我没学过 js,暂时也看不明白。转而自己写了一个,基于 OpenCV 获取摄像头视频流,数据处理后再传给 remi 创建服务器,实现浏览器页面实时预览,支持对 cv 图像修改再显示到网页上(作为示例我添加了一个帧率显示)。
"""
Copyright (C) 2022 IYATT-yx iyatt@iyatt.com
Everyone is permitted to copy and distribute verbatim copies of this license document, but changing it is not allowed.
This program is free software: you can redistribute it and/or modify
it under the terms of the GNU Affero General Public License as published
by the Free Software Foundation, either version 3 of the License, or
(at your option) any later version.
This program is distributed in the hope that it will be useful,
but WITHOUT ANY WARRANTY; without even the implied warranty of
MERCHANTABILITY or FITNESS FOR A PARTICULAR PURPOSE.  See the
GNU Affero General Public License for more details.
You should have received a copy of the GNU Affero General Public License
along with this program.  If not, see <https://www.gnu.org/licenses/>.
"""

"""
    摄像头预览
    通过 OpenCV 获取视频流,数据经过处理后传给 remi 创建网页实时预览
    可看作一个简易的监控程序,如果部署到公网,则随时可访问摄像头,remi 也支持添加访问账户密码。
"""

import cv2
from remi import gui, start, App
import base64


"""
    在图像处理方法中添加帧率
"""
last = cv2.getTickCount()  # 启动时间
frequency = cv2.getTickFrequency()  # CPU 频率

def img_process(img):
    """ 图像处理
        可在这里对 OpenCV 图像进行修改,图像类型为 np.array()
    """

    ############################### 帧率
    global last
    now = cv2.getTickCount()
    fps = int(frequency / (now - last))
    cv2.putText(img, 'Fps:' + str(fps), (30, 30), cv2.FONT_HERSHEY_COMPLEX, 1, (0, 0, 255))
    last = now
    ###############################

    return img


def cv_img_to_base64(cv_img):
    """
        OpenCV 的图像转为 base64
    """
    img = img_process(cv_img)
    img = cv2.imencode('.jpg', img)[1]
    img = 'data:image/png;base64,' + str(base64.b64encode(img))[2:-1:]
    return img


class MyAPP(App):
    def idle(self):
        ret, self.frame = self.cam.read()
        self.frame = cv_img_to_base64(self.frame)
        self.img.set_image(self.frame)

    def main(self):
        self.cam = cv2.VideoCapture(0)
        ret, self.frame = self.cam.read()
        self.frame = cv_img_to_base64(self.frame)

        root = gui.VBox()
        self.img = gui.Image(self.frame)
        root.append(self.img)
        return root


if __name__ == '__main__':
    start(MyAPP, port=9999, update_interval=0.01, start_browser=True, debug=True)  # update_interval 的值影响 idle 执行的频率,间接影响图像帧率
'''
Copyright (C) 2022 IYATT-yx iyatt@iyatt.com
Everyone is permitted to copy and distribute verbatim copies of this license document, but changing it is not allowed.
This program is free software: you can redistribute it and/or modify
it under the terms of the GNU Affero General Public License as published
by the Free Software Foundation, either version 3 of the License, or
(at your option) any later version.
This program is distributed in the hope that it will be useful,
but WITHOUT ANY WARRANTY; without even the implied warranty of
MERCHANTABILITY or FITNESS FOR A PARTICULAR PURPOSE.  See the
GNU Affero General Public License for more details.
You should have received a copy of the GNU Affero General Public License
along with this program.  If not, see <https://www.gnu.org/licenses/>.
'''

'''
Ubuntu  20.04 x86_64
Python  3.9.10
OpenCV  4.5.5
remi    2021.3.2
'''

import cv2
from remi import start, App, gui
import os
import base64
import time


def cv_img_to_base64(cv_img):
    """ OpenCV 的图像转为 base64
        Web 页面显示图像需要格式为 base64
    """
    img = cv2.imencode('.jpg', cv_img)[1]
    img = 'data:image/png;base64,' + str(base64.b64encode(img))[2:-1:]
    return img


class Main(App):
    def idle(self):
        ''' remi 内置自动循环方法
        '''
        ret, bgr_img = self.cap.read()
        if not ret:
            return
        base64_img = cv_img_to_base64(bgr_img)
        self.video_show.set_image(base64_img)

    def switch_camera(self, emitter, option):
        ''' 切换摄像头
        '''
        self.cap.release()
        self.cap = cv2.VideoCapture(option)
        self.video_width = self.cap.get(cv2.CAP_PROP_FRAME_WIDTH)
        self.video_height = self.cap.get(cv2.CAP_PROP_XI_HEIGHT)
        self.video_show.set_size(self.video_width, self.video_height)  # 重新设置视频窗口大小

    def setup_page(self, emitter):
        ''' 设置页面
        '''
        ###############################
        # 读取配置信息文件
        ###############################
        setup = cv2.FileStorage(setup_file_path, cv2.FileStorage_READ)
        port = int(setup.getNode('port').real())
        setup.release()

        ##############################
        # 创建设置页面
        ##############################
        page = gui.GenericDialog('设置', width=800)
        port_label = gui.Label('端口')
        page.append(port_label)
        self.port_input = gui.Input(input_type='int', default_value=port)
        page.append(self.port_input)
        page.confirm_dialog.do(self.setup_confirm)
        page.show(self)

    def setup_confirm(self, emitter):
        ''' 保存设置
        '''
        setup = cv2.FileStorage(setup_file_path, cv2.FileStorage_WRITE)
        port = int(self.port_input.get_value())
        setup.write('port', port)
        setup.release()

    def main(self):
        ############################################################################
        # 检查摄像头设备
        # 接入 1 个摄像头时会有 /dev/video0 和 /dev/video1 两个文件
        # 接入第 2 个摄像头时会有 /dev/video2 和 /dev/video3 两个文件
        # 其中偶数设备是可以读取视频流的
        # 注:具体我也不清楚为啥,反正只知道一个摄像头会有两个设备文件,只有第一个可以读取
        #############################################################################
        camera_devices = []
        for i in range(0, 20, 2):
            if os.path.exists('/dev/video{}'.format(i)):
                camera_devices.append(i)

        if len(camera_devices) == 0:
            print('请插入摄像头后重新运行本程序!')
            self.on_close()

        self.cap = cv2.VideoCapture(camera_devices[0])
        if not self.cap.isOpened():
            print('打开摄像头设备失败')
            self.on_close()

        self.video_width = self.cap.get(cv2.CAP_PROP_FRAME_WIDTH)
        self.video_height = self.cap.get(cv2.CAP_PROP_XI_HEIGHT)

        #############
        # 窗口界面
        #############
        root = gui.VBox()  # 顶层容器
        self.video_show = gui.Image(width=self.video_width, height=self.video_height)  # 视频窗口
        root.append(self.video_show)

        row2 = gui.HBox()
        root.append(row2)
        for i in camera_devices:  # 相机选项按钮
            switch_camera_btn = gui.Button('相机{}'.format(i), width=60, height=30)
            switch_camera_btn.onclick.do(self.switch_camera, i)
            row2.append(switch_camera_btn)

        row3 = gui.HBox()
        root.append(row3)
        setup_btn = gui.Button('设置', width=60, height=30) # 设置按钮
        row3.append(setup_btn)
        setup_btn.onclick.do(self.setup_page)

        return root


if __name__ == '__main__':
    abs_path = os.path.dirname(os.path.abspath(__file__))  # 程序绝对路径
    setup_file_path = os.sep.join([abs_path,'setup.xml'])  # 设置文件路径

    #####################################################
    # 初始设置
    # 首次运行会创建设置信息文件
    # 如果需要重置,可以删除 setup.xml,再次运行会重新创建
    #####################################################
    if not os.path.exists(setup_file_path):
        setup = cv2.FileStorage(setup_file_path, cv2.FileStorage_WRITE)
        setup.write('port', 8080)  # 端口号
        setup.release()

    ###################
    # 读取设置信息文件
    ###################
    setup = cv2.FileStorage(setup_file_path, cv2.FileStorage_READ)
    port = int(setup.getNode('port').real())
    setup.release()

    start(  # 启动服务
        Main,
        address='0.0.0.0',
        port=port,
        title='监控',
        update_interval=0.01,
        debug=False
    )
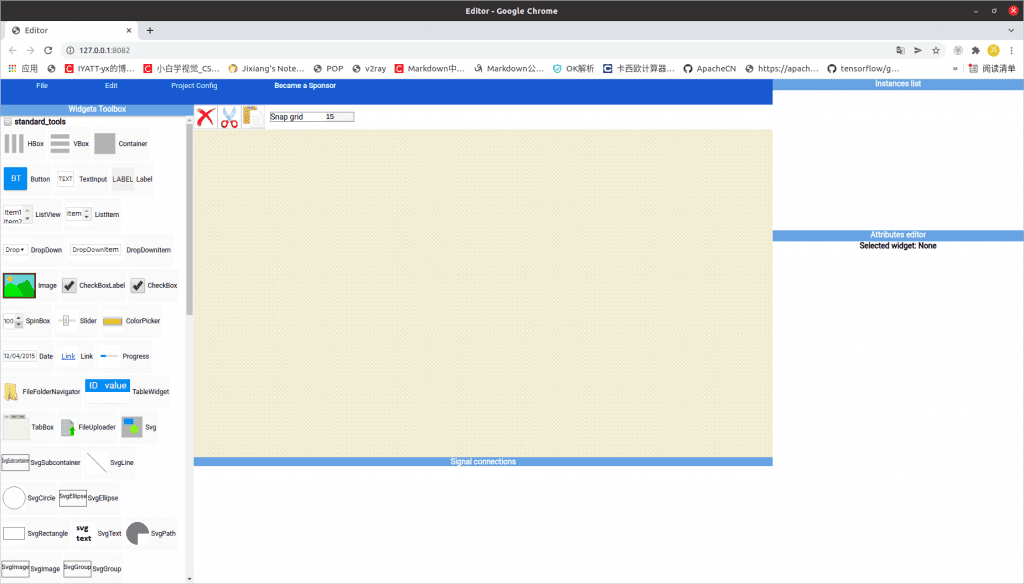
拖放式 GUI 编辑器
程序简单的时候代码还好写,但是涉及到复杂的程序时就十分恼火。remi 也提供了拖放式编辑器,路径位于 https://github.com/dddomodossola/remi/tree/master/editor